This workflow tutorial teaches you how to use HDR Light Studio with Blender.
Watch the HDR Light Studio - Quick Start video first to learn the key concepts of HDR Light Studio.
Ensure you have installed the HDR Light Studio main application and the HDR Light Studio Add-on for Blender. Requires Blender 3.6.12 LTS and higher for this workflow.
 If you'd prefer to learn with a video tutorial - you can watch our Blender: Getting Started video
STEP 1: Start Blender and load your Project
Before we start to use HDR Light Studio, let's make sure the scene is ready to light first.
Camera View
Make sure you have a camera setup with the final composition for the shot that you want to light. If you move the camera during the lighting process, the reflections of the lights will move and this can dramatically change the lighting effect.
Existing Lights
A blank lighting canvas is the best place to start. Ideally your scene should not contain any lighting before using HDR Light Studio. You may have set up some environment lighting during the look development for the scene, so now is a good time to delete or hide this. We want to avoid confusion by mixing lights created with HDR Light Studio and those not created with HDR Light Studio.
 Tip: If you have an HDRI map you want to edit that's already lighting the scene, hide or delete this light and load the same HDRI map into HDR Light Studio once it's open.
In this example, we are using the Cycles renderer (see Figure 1).

Figure 1: Blender on startup after loading a project
STEP 2: Go to the HDR Light Studio controls in Blender
With the HDR Light Studio Add-on installed, go to 'World Properties' and expand the new 'HDR Light Studio' section (see Figure 2).

Figure 2: HDR Light Studio controls
STEP 3: Start HDR Light Studio from Blender
On the HDR Light Studio controls, click the Start button (see Figure 3).

Figure 3: Starting HDR Light Studio
 Important: The HDR Light Studio API uses TCP/IP to communicate. When first starting HDR Light Studio you may be asked for permission to use TCP/IP. It will require ports 5555,5556,5557 and 5558 to be open. Please allow these TCP/IP communications for the Add-on to function correctly.
The add-on creates a new world called HDRLS World, even if there is already a non HDRLS World set up.
RenderMan Users: Instead of creating a new world, the add-on creates a new RenderMan/Pixar Dome Light called HDRLS Dome Light, and it will be visible in the Blender Outliner. This is the case even if there is already a non HDRLS Dome Light set up. Once the HDRLS Dome Light is set up in the project, HDR Light Studio will always use that Dome Light to connect with.
A shader network is created for the HDRLS World where the environment texture uses an Image data-block called HDRLS World Tex that always references an up-to-date HDRI map file from HDR Light Studio (see Figure 4).
You can read more about the HDRLS World here.

Figure 4: Shader network created for HDRLS World
The HDR Light Studio interface should look like the interface shown in Figure 5. If it doesn't, go to Window > Layout > Load > Default > Blender.

Figure 5: HDR Light Studio UI
The current HDRI map design in HDR Light Studio is shared with Blender as a temp proxy (lo-res) image. A proxy is used because it's faster to calculate and faster for Blender to load during the iterative lighting design process. When the lighting design changes in HDR Light Studio, this image is updated in Blender to use a new temp file with a new file name. This ensures the renderer uses the latest image even if images are cached.
STEP 4: Start Interactive Blender Rendering
Turn on interactive rendering in the Blender Viewport.
Performance Tip: For optimum performance, change the amount of threads used for rendering in Blender to leave some for HDR Light Studio's operation. By default with CPU Cycles for example, threads are set to Auto-Detect and uses all threads. Reducing this by choosing Fixed threads and allowing 4 threads for HDR Light Studio will provide a smoother lighting process.
Press the Play button in the Render View (Blender/Blender) in HDR Light Studio.
Now the interactive rendering viewport can be seen in the HDR Light Studio interface (Figure 6).

Figure 6: Blender Viewport streaming into HDR Light Studio interface
The whole viewport from Blender is shown in the HDR Light Studio interface including buttons and controls from the Blender UI. These buttons will not function when pressed in the HDR Light Studio UI. Our add-on is only able to grab the whole viewport and not just the render region.
You can maximize the HDR Light Studio interface now and concentrate on lighting the shot all from the HDR Light Studio UI.
Changing the Camera View: There is a drop-down at the top of the Render View in HDR Light Studio that can be used to switch the camera view in Blender. This avoids the need to go back into Blender to change the camera. You can also change to the current perspective view, which is not strictly a camera.
STEP 5: Let's create our first light in HDR Light Studio
In the Render View by default, LightPaint is set to Move mode using Reflection method. This means lights are positioned to reflect in the chosen location on the 3D model when dragging and dropping lights, and when clicking to re-position a light (see Figure 7). Learn more about LightPaint here.

Figure 7: LightPaint default method set to Reflection
Drag and drop a Preset Light onto the 3D model in the Render View (see Figure 8).

Figure 8: Dragging and dropping a Preset Light onto the 3D model.
The Preset Light has now been added to the lighting design in a location that is reflecting where the light was dropped on the 3D model.
You can adjust the Brightness of the light now to get the desired visual effect.

Figure 9: Adjusting the light Brightness in Light Properties
You will now see (Figure 10):
• A new light in the Light List in HDR Light Studio
• The new light has been added on the Canvas (HDRI Map View) in HDR Light Studio
• The HDRI Map is updated in Blender, the interactive render updates, the Render View in HDR Light Studio updates to show the new lighting

Figure 10: HDR Light Studio interface after creating a light
STEP 6: Reposition a light with LightPaint
You can see that the LightPaint tool is active in the toolbar within the Render View.
Click on the 3D model to reposition the selected light (Figure 11).

Figure 11: Using LightPaint to position light on the 3D scene
STEP 7: Choose Area Light Type Setting (Cycles & Eevee)
If you are using Octane or RenderMan, you will not see this setting and you can skip to the next step.
Cycles and Eevee users have the option to choose between 2 different methods of Area Light creation in the Blender scene:
Mesh Emitters or Blender Area Lights
The type of area light that should be used for the project depends on the user's workflow and preference. Read the comparison between Mesh Emitter and Blender Area Lights to find out more about which type is more suitable for your needs.
Return to Blender's interface and in the HDR Light Studio controls choose your preferred Area light type.
In this example, we are choosing Mesh Emitters (see Figure 12).

Figure 12: Mesh Emitter area light type selected
Area Light Type is a global setting and will determine the type of all area lights made by HDR Light Studio in the Blender scene. This setting is also dynamic and can be changed between Mesh Emitter and Blender Area Light at any time and the lights will be instantly rebuilt in the chosen format.
So far the lighting created is on a HDRI map shared with Blender. With a single Area Light setting, a light with 3D mapping in HDR Light Studio can be removed from the HDRI map design and created as a HDR textured Area Light in 3D space in Blender.

Figure 13: Area Light check box for light with 3D mapping
Return to HDR Light Studio, and enable the Area Light check box in the Light Properties panel for the selected light.

Figure 14: Area light check box ON, settings show for Area Light control
As a result of enabling the Area Light setting, these things instantly happen (Figure 15):
1. The Light in the Light List gets the suffix [AreaLight] and the text is now yellow - clearly showing which lights are Area Lights.
2. The light is removed from the HDRI map shared with Blender, but is still shown on the Canvas for reference.
3. Additional Area Light properties are shown in the Light Properties for this light, with a default Smart Dolly distance of 1,000 units.
4. A mesh emitter Area Light has been created in Blender mapped with the live HDR texture from HDR Light Studio.
To find out more about the behavior of area lights created by HDR Light Studio for your renderer, read Area Lights in Detail.

Figure 15: Light converted into an area light of type 'Mesh Emitter'
STEP 9: Adjust the distance of the Area Light from the 3D model
Reduce the Smart Dolly slider value to move the light closer to the 3D model (see Figure 16).

Figure 16: Moving the area light closer to the model
HDR Light Studio has a scene scale setting that is useful when working with area lights in Blender. If the area lights are too close or too far away by default when using the slider, adjust the Smart Dolly Scalar value in Preferences. This value scales all area lights made with HDR Light Studio. You can watch a video to learn about this scale setting here.
STEP 10: Moving Area Lights
In HDR Light Studio, use LightPaint to click in the Render View to move the Area Lights (see Figure 17).
In fact, area lights are controlled just like any other light in HDR Light Studio, with the addition of the distance settings - Smart Dolly and Dolly Multiplier.

Figure 17: Using LightPaint to position the area light
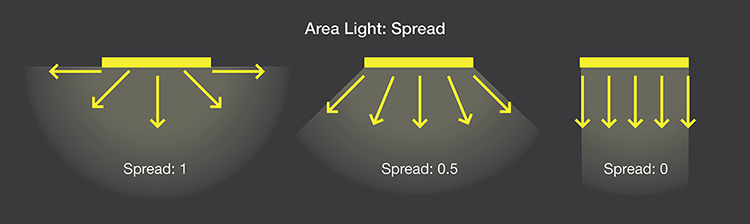
Area Light Spread - Cycles (Blender Area Lights) only
You can use the Spread setting to change the spread of the light emitting from the area light.
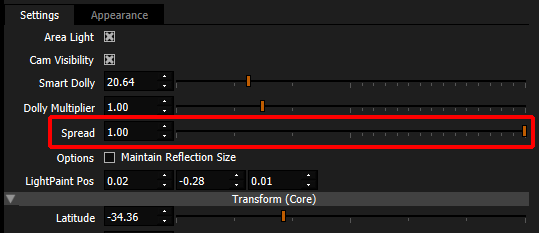
This is how the spread setting changes the light emitting from the area light.
STEP 11: Finalizing the lighting design
Once you are happy with your lighting, press the Render Production HDRI button in HDR Light Studio
It says HDR on the button.

Production Render buttons
Set your Production Render settings and Press Render in this panel. Notice how the 'Orientation' is already set to 'Blender/Blender', this ensures that the rendered HDRI map is mapped. For more information see: Production Render Dialog

Production Render Panel
The production quality HDR files will be calculated and saved as files on disk. The add-on will automatically update Blender to use these final high-res area lights and HDRI map images.
If any further changes are now made to the lighting in HDR Light Studio, all content will be updated to use new lo-res proxy versions again.
So please ensure you 'Stop' the HDR Light Studio after you have produced your production lighting by Pressing the Stop button.

Stopping the HDR Light Studio connection
If you stop the HDR Light Studio and have not produced a production render of the final lighting, the temporary lo-res files will be replaced with blue HDR Light Studio logo images. This serves 2 purposes: It stops the Blender scene from referencing the temporary HDR files that will disappear, causing missing file errors in the future, and it makes it clear to the user that the lighting has not been produced at a high quality avoiding the low quality temporary files being used by accident.
Save the Blender scene to store the HDR Light Studio lighting project
If you would like the current HDR Light Studio project to be saved in your Blender scene for next time you load this Blender scene, you should save your Blender scene now. This way the scene state matches the HDRI map and area lights that are currently in the HDR Light Studio project.
Saving and loading HDR Light Studio projects
HDR Light Studio projects can be saved from the HDR Light Studio interface at any time during the lighting process as a HDi file (native HDR Light Studio project file), even when using HDR Light Studio via a plug-in. If you were to open HDR Light Studio in a connection with Blender, this project can be loaded into HDR Light Studio using Project > Open Project. The lighting design would load into HDR Light Studio replacing its current design, and would then be synced back into Blender. This is how you can move lighting between Blender projects or between other supported 3D software.
Switching to a different Renderer
If you decide to light the same scene using a different renderer, we recommend that you Purge Lights before switching to a different renderer and starting HDR Light Studio again - find out more about the Purge Lights function here.

Purge Lights button
