When using HDR Light Studio, proxy lighting content (HDRI map and Area Light images) is used to keep the software fast and responsive. But when the lighting process is complete, this low resolution content needs replacing with higher quality (sub-sampled), high resolution imagery. We call this stage a 'Production Render'.
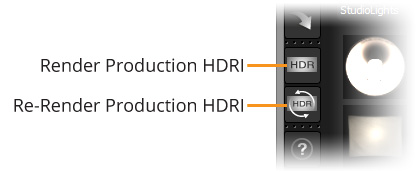
Press the 'Render Production HDRI' button on the toolbar (HDR) to open the Production Render dialog.

Production Render dialog
Map Settings
Orientation
When using HDR Light Studio in a connection with your 3D software, the Orientation setting will display the name of your host 3D software and chosen renderer. This is automatically set by the connection so that the HDRI map is rendered correctly for your 3D software/renderer combination.

We need this setting to overcome that different 3D software and renderers use different default orientations for their image based lighting sphere/dome, i.e. both sphere horizontal rotation and horizontal mapping direction of the HDRI map.
These settings apply a rotation and optional image flip to HDRI map output, to ensure the lighting positions are correct in your 3D software/renderer.
When using HDR Light Studio standalone, use the two Orientation drop-downs to ensure the image based lighting in your 3D software/renderer is correct. The default setting is Canvas, this means no rotation or flip will be applied. If your 3D software/renderer combination is not listed, you can choose Custom and manually set a rotation value and optional flip.

These are the only settings you would need to test to find a match for your unlisted 3D software/renderer.
Rotation 0 - Flip Off
Rotation 90 - Flip Off
Rotation 180 - Flip Off
Rotation 270 - Flip Off
Rotation 0 - Flip On
Rotation 90 - Flip On
Rotation 180 - Flip On
Rotation 270 - Flip On
The rotation and flip settings for each combination in the drop-down menu is stored in an XML file called 'HostPresets.xml'. This is located next to the installed HDR Light Studio executable file. This file can be edited by a more advanced user, to add new host/renderer combinations.
Resolution
Sets the pixel resolution of the output HDRI map image. Includes a list of preset sizes, or a Custom option, where the user sets the width of the HDRI map.
Format
Determines the file type used to save the HDRI map. In most situations it is best to select the EXR image format as it is the highest quality format.
Area Light Settings
Resolution
Area light content is always rendered as a square image. Use this setting to set the width and height pixel dimensions for the output images for area lights.
Format
Displays the output image formats generated for the area lights. Currently this is set by the host app that is connected to HDR Light Studio. Area Lights can be represented by one or two output images depending on the requirements of the renderer. We need two images sometimes to correctly set up the light to honor an alpha channel.
Options
EXR Options
With EXR set as the output format, these options control additional output settings.
Color Transform
Enable this checkbox to select a LUT from the loaded OCIO Config.
This should not be needed as it will create lighting that looks different to the live HDR content. But it can be used to load a LUT for a visual effect if needed.
Pow2 Textures
Forces rendered output to be power of 2 size, it will render at the next Pow2 size up from the current resolution settings.
Fast Preview
Normally the rendered output content is super sampled. If you want a faster output render, you can turn on Fast Preview, and the image will get only one sample per pixel, making it much faster but with more jagged edges to lights.
Thumbnails
Enable this option to save a thumbnail versions of the HDRI map and area lights as PNG files at render time. Many operating systems do not provide preview images of HDR content, so it can be handy to have thumbnails to help identify lights. These can also be useful for asset management in larger pipelines.
RenderView
Enabling this option saves the currently open Render View images as PNG files with the display LUT baked into those images. The images will have a suffix to identify which view they came from, for example:
the_file_name_(3DSMax_VRay).png
the_file_name_(HDRLightStudio).png
Project
Enable this option to save a Project File (HDi) of the current lighting design at production render time. This provides a very handy snapshot of the lighting design that shares the exact same file name as the HDRI map produced. This provides an interesting new workflow, where you could decide not to use the normal Project Save method, and only save projects at render time, the perfect time to capture the project associated with the output image set.
Output
Master File
Use the Browse button to choose the location for your rendered content, and to set the Master File name.
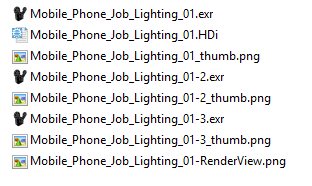
This file name will be used for the HDRI map and as the start of the file names of all the other content files produced at render time.
For example, if the Master File name is Mobile_Phone_Job_Lighting_01
Here is what a set of content would look like if we enabled options for Save Thumbnails, Save Render View and Save Project:
Cancel Button for Production Rendering - New in 9 Drop 4
Previously, once you started a high-resolution production render, you had to wait for it to finish before you could do anything else. You can now cancel a production render in progress at any time, stopping it at the earliest opportunity so you can get back to work.

Cancel button
