In HDR Light Studio 8 Drop 1 - the LightPaint system has had a major overhaul.
Originally 'LightPaint' controlled only the light positions when clicking and dragging on the 3D model.
This page explains the new expanded LightPaint system and keyboard shortcuts.
What is The LightPaint System?
LightPaint is a system that lets you control the properties for a selected light with mouse interactions in the Render Views and Canvas. The goal of LightPaint is to make it as easy and fast as possible to adjust and develop the lighting for a shot, without needing to leave the views.
How LightPaint works...
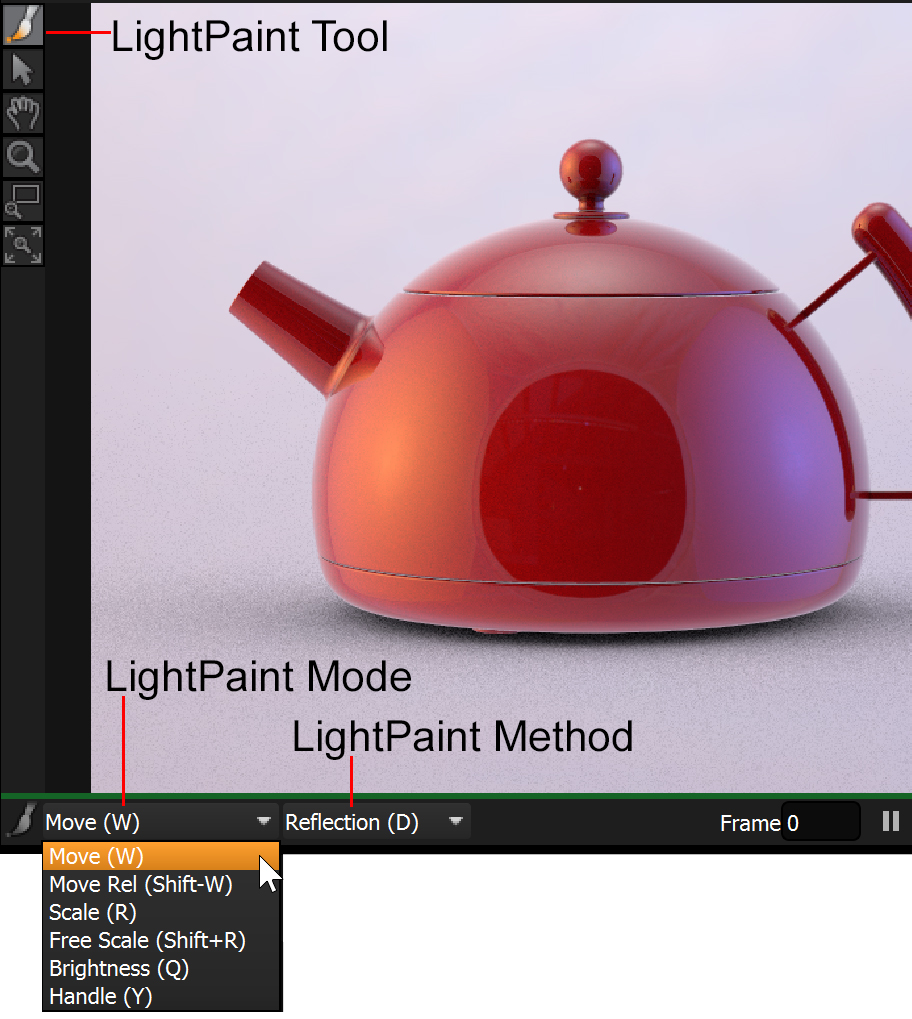
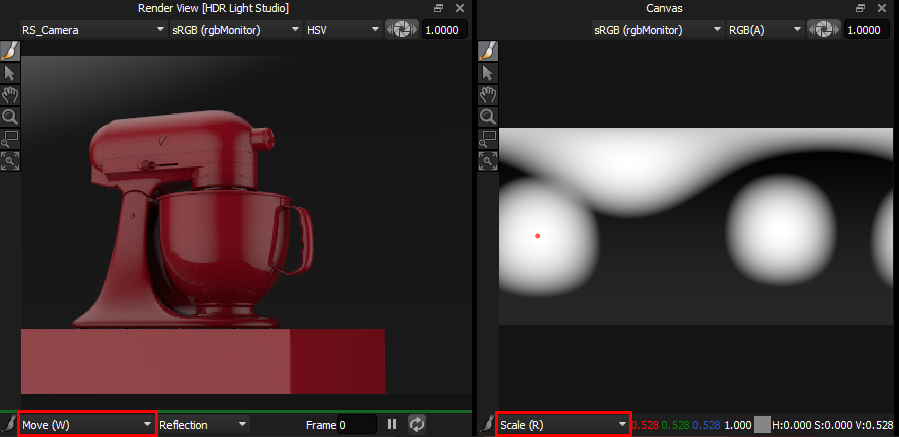
LightPaint is the default tool in the Render Views and Canvas - and its button icon is a 'brush'.
At the bottom of the view is a drop-down list where you select the LightPaint mode. This mode controls how the mouse input will change the selected light's properties. The contents of the drop-down list changes depending on the available settings for the selected light. The default LightPaint mode is Move. This ensures that by default the views behave like older versions of HDR Light Studio.
LightPaint Tool Modes
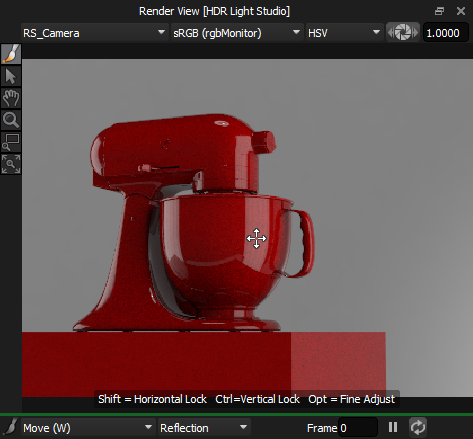
Move (on the Render Views)
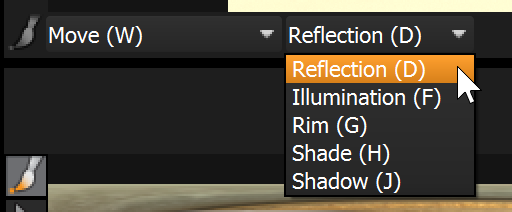
In order to move the Light, LightPaint uses the active LightPaint method.
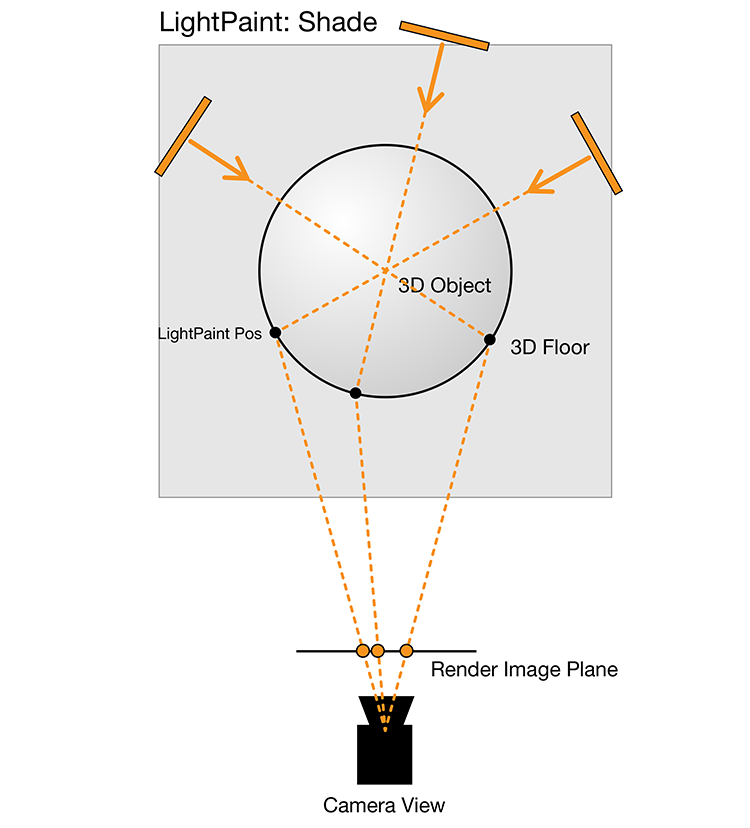
New methods added for HDR Light Studio 8 Drop 2: Shade and Shadow
Moving lights with LightPaint is a key feature in HDR Light Studio. This allows you to precisely position your lighting effect by clicking (and dragging) on the 3D model in the Render Views.
Let's take a look at the range of LightPaint methods.
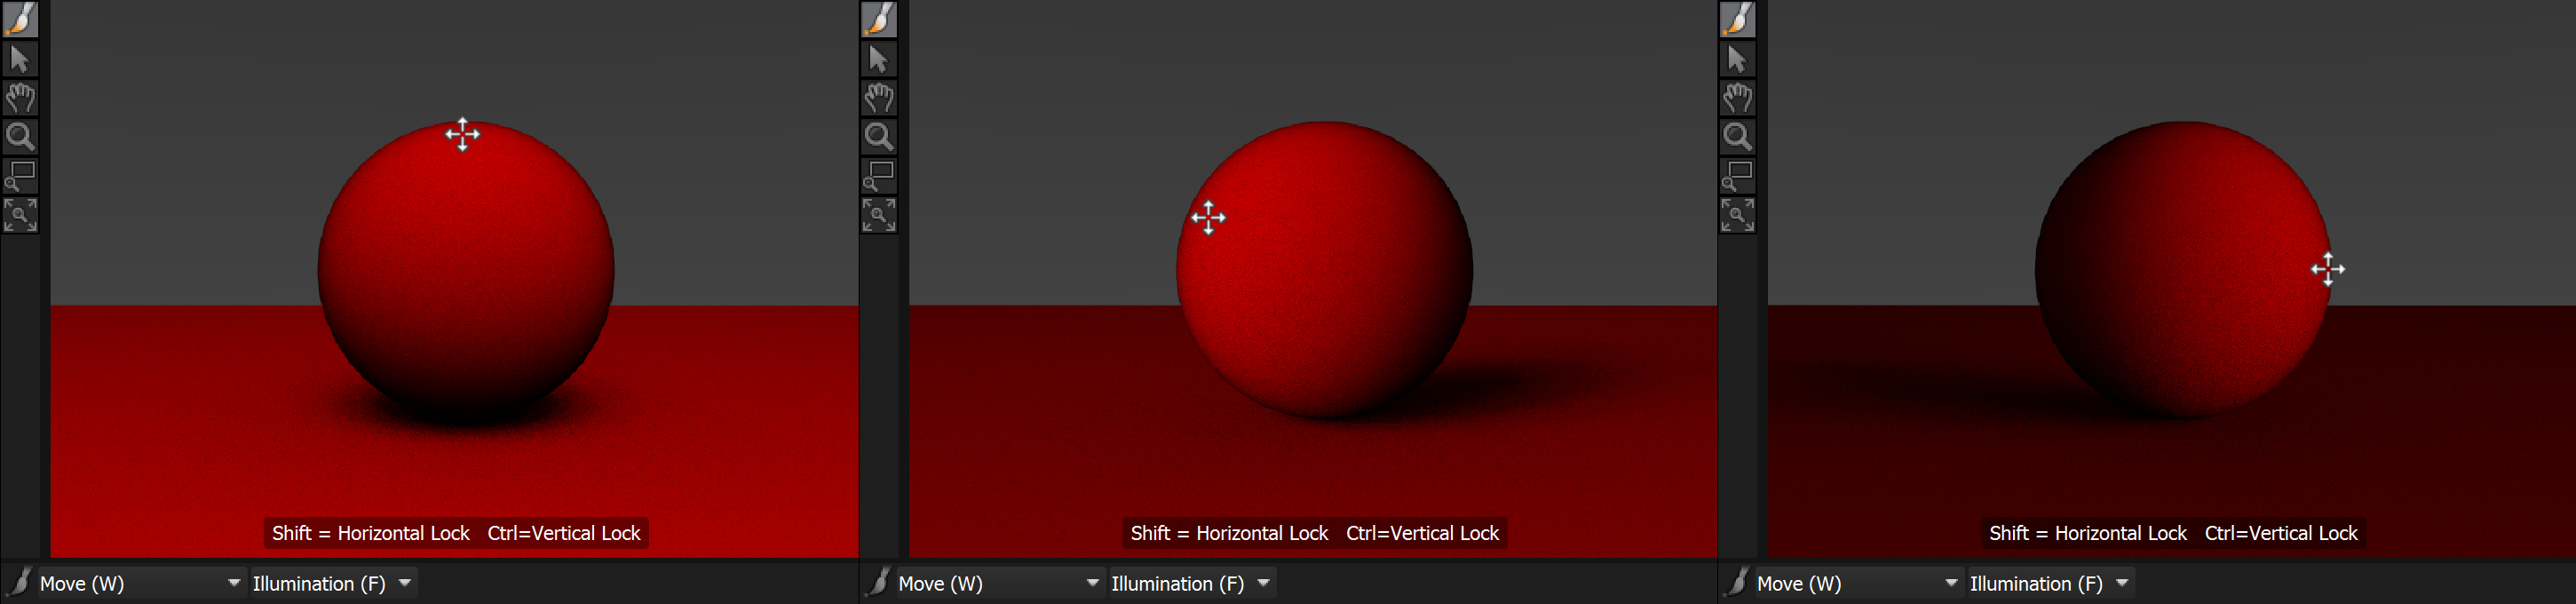
LightPaint Move Mode: Illumination
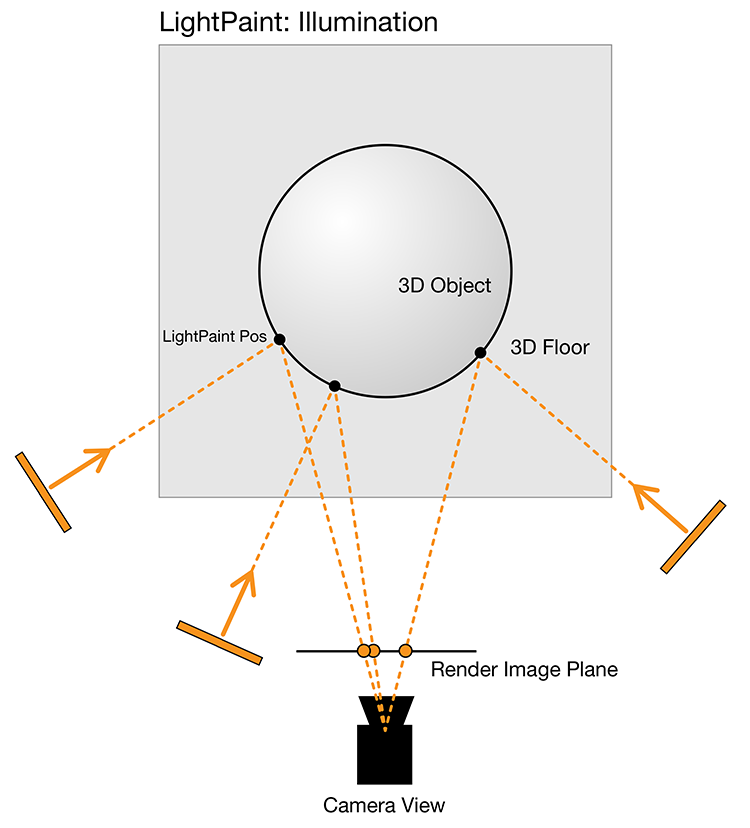
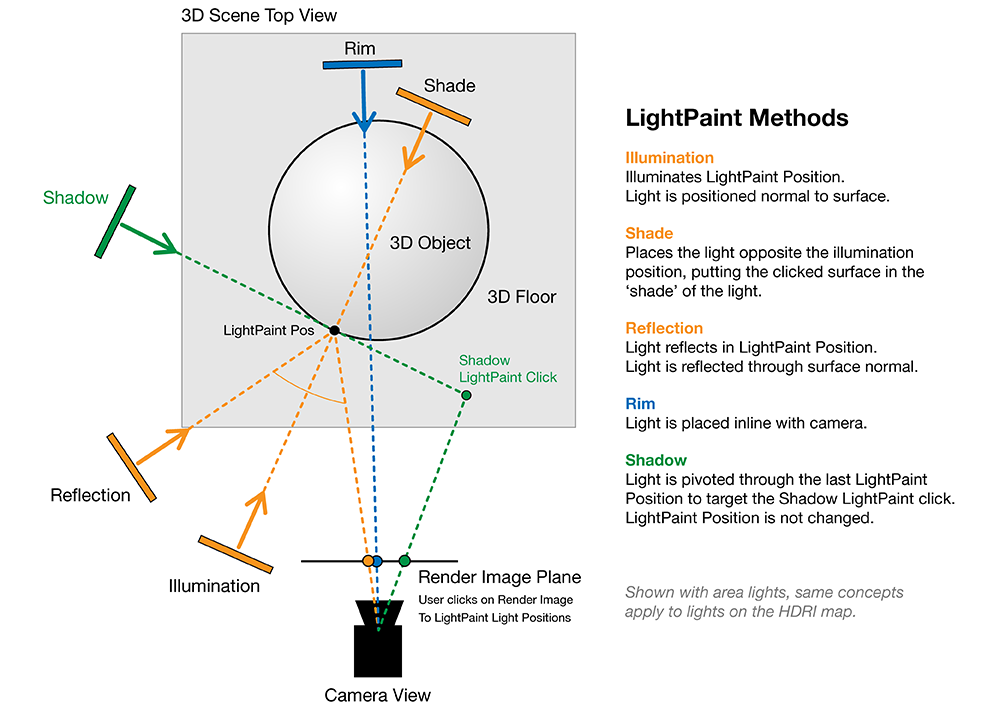
Illumination positions the light normal to the surface. This faces the light directly to the surface and illuminates the location where clicked.
Here are some examples showing the cursor in the position where clicked. This position will not align with the reflection of the light!!!
You can see the light is facing the direction where clicked.
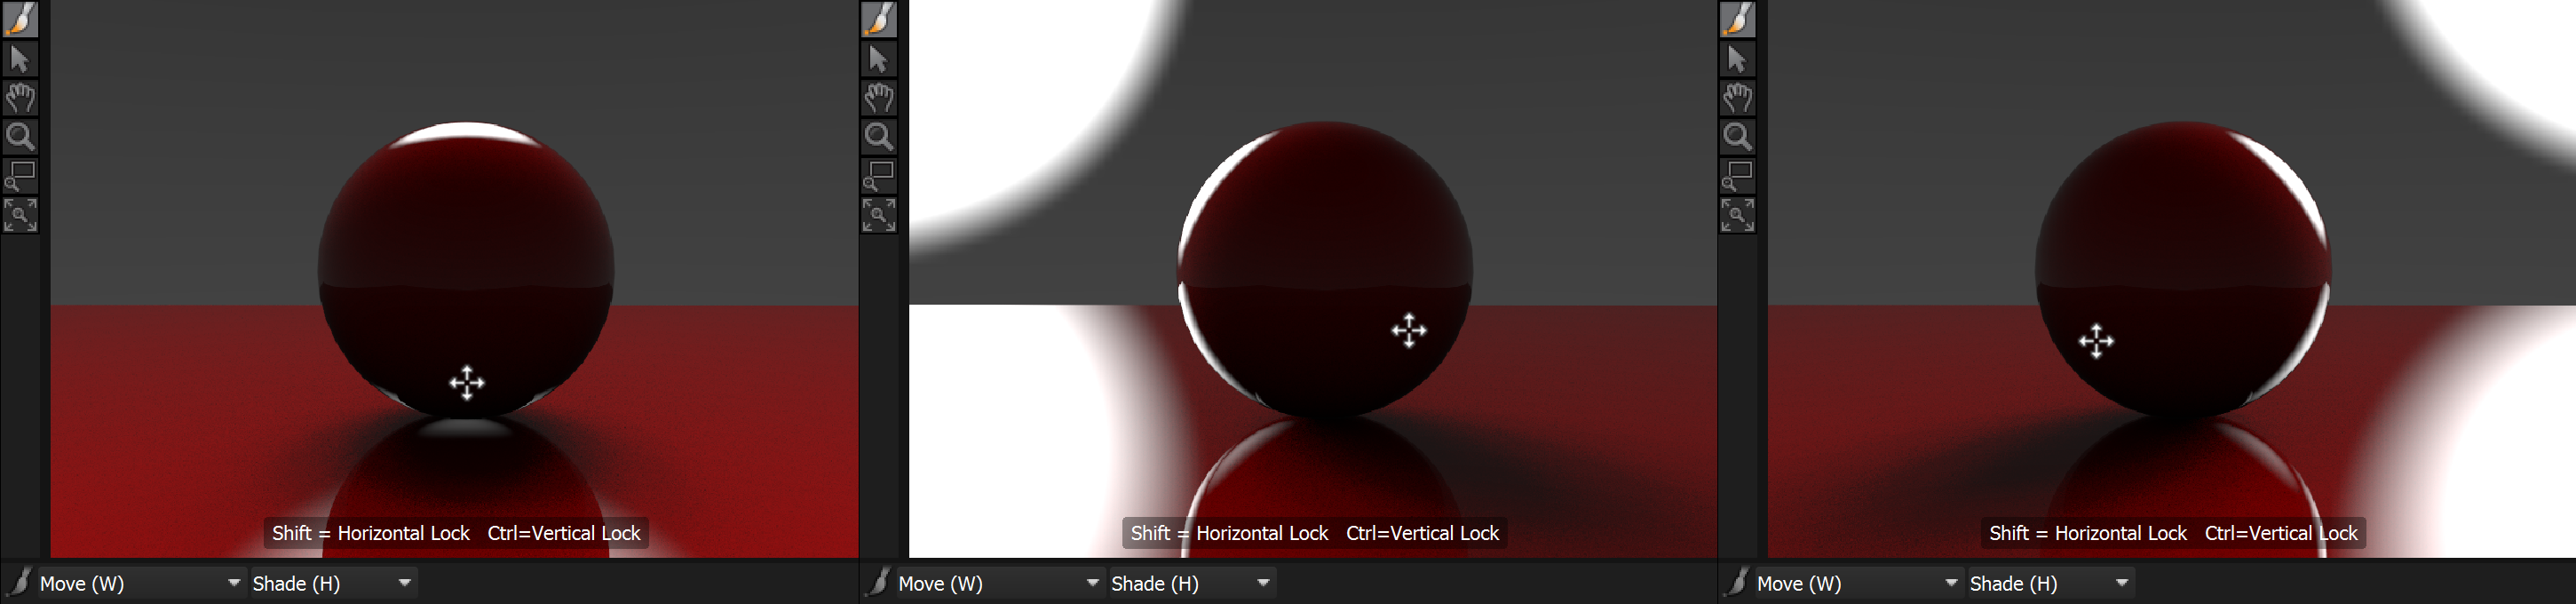
LightPaint Move Mode: Shade
Shade positions the light normal to the surface, but facing in the opposite direction, and puts the surface in shade from the light.
Here are some examples showing the cursor in the position where clicked.
You can see the light being positioned on the opposite side of the object, placing the clicked location in the shade.
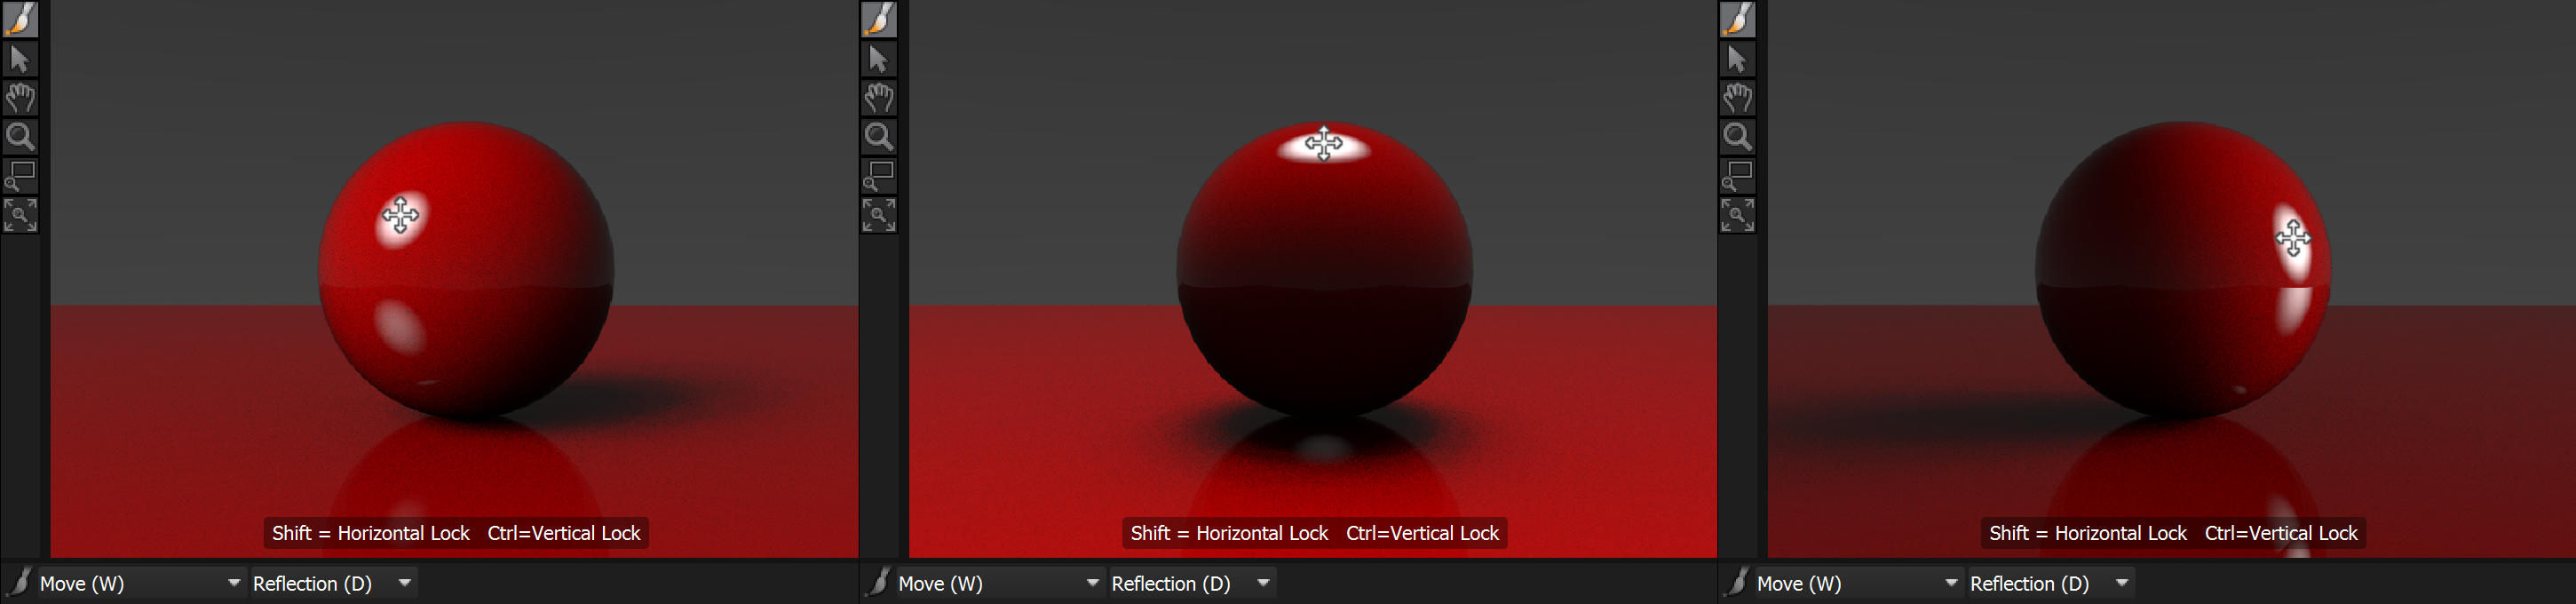
LightPaint Move Mode: Reflection
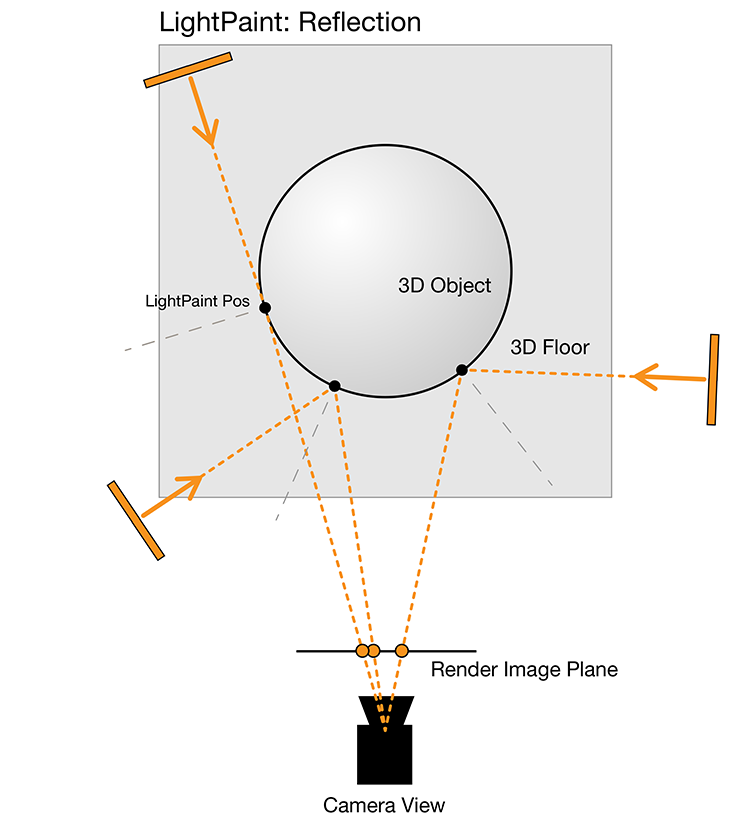
Reflection positions the light reflected through the normal to the surface. The light is positioned to be seen in the reflection of the surface. You can place highlights this way.
Here are some examples showing the cursor in the position where clicked.
You can see the light reflected in the exact locations where clicked.
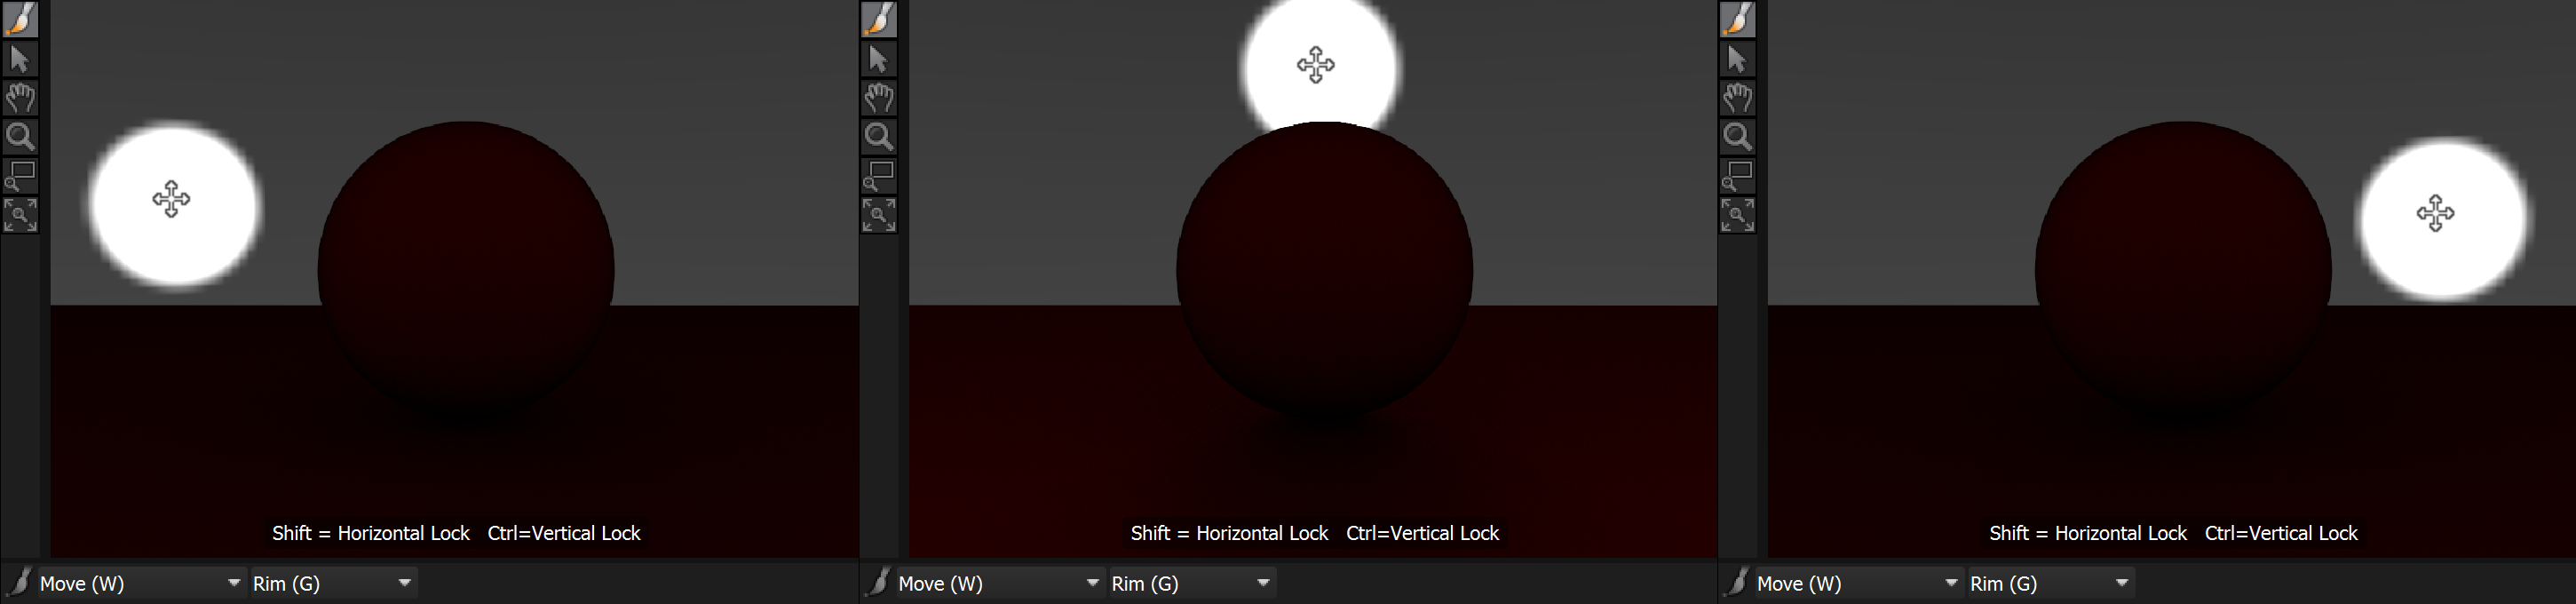
LightPaint Move Mode: Rim
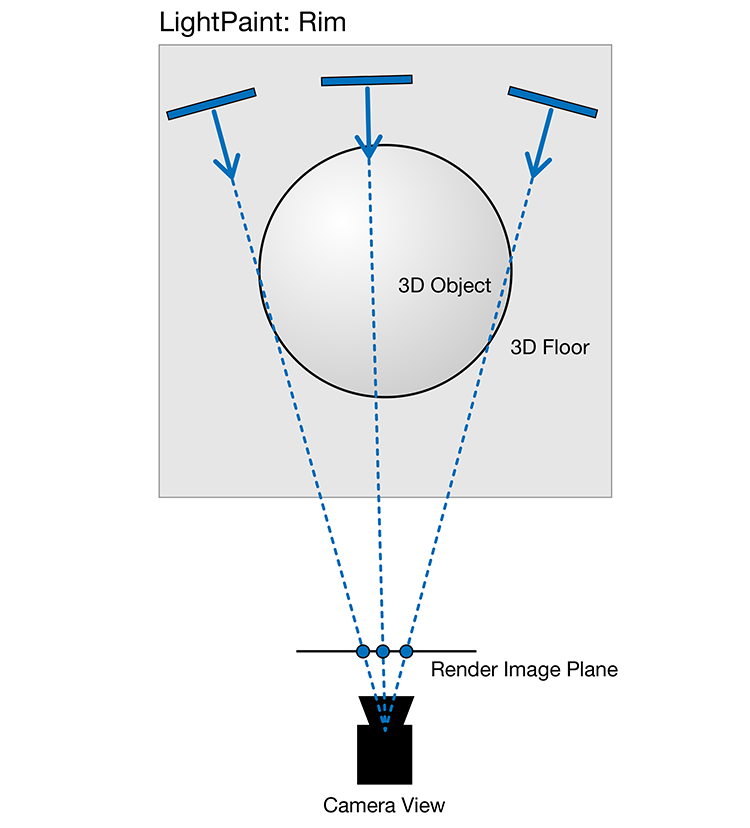
Rim positions the light inline with the location clicked from the camera point of view. It ignores the 3D scene geometry entirely. If the light is on the HDRI map, you will be positioning it in the background behind the scene. If the light is an area light, the distance setting will determine how far the light is from the camera.
Here are some examples showing the cursor in the position where clicked (on the HDRI map).
You can see the light in the background matching the cursor location.
LightPaint Move Mode: Shadow
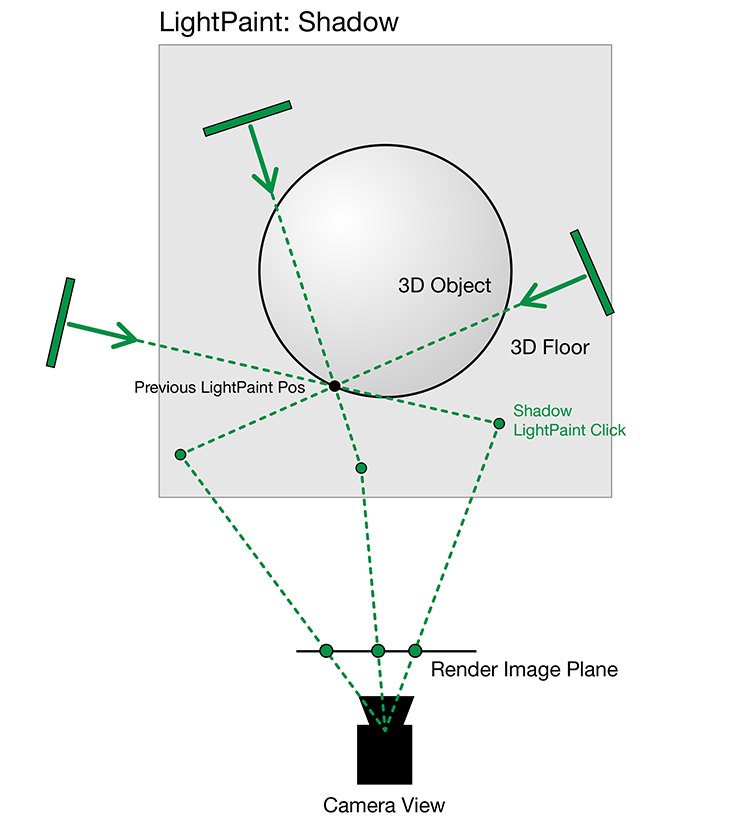
Shadow pivots the light through its existing LightPaint position, and directs the light towards the clicked location. This allows the light to be moved to position its shadow.
We recommend initially placing the light using reflection mode, to set the LightPaint location, and then adjust the shadow.
Here are some examples showing the cursor in the position where clicked.
See how the shadow moves to the location of the cursor.

Move (on Canvas)
Light moves directly to the position where clicked on the Canvas.
Move Rel (Relative)
Dragging in the Render Views and Canvas will adjust the position of the light relative to the amount of mouse movement and direction of dragging. This is ideal for adjusting the light position based on its current position.
Smart Dolly
This is only shown for area lights. Dragging the cursor to the left and right, decreases and increases the smart dolly distance.
Rotate
Dragging the cursor to the left and right, decreases and increases the light rotation value.
Please Note: Rotate is not applicable to planar lights, like a background light. Planar lights do not have a rotate property. To rotate a HDRI background, use Move Relative, and lock to the horizontal axis holding keyboard qualifier CTRL. This will change the Latitude of the light and provide the effect of rotating the HDRI map.
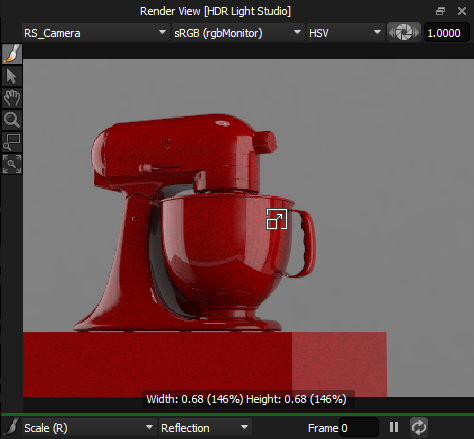
Scale
Dragging the mouse to the left and right, proportionally decreases and increases the size of the light.
New in HDR Light Studio 9.3
Energy Conserving Light Scaling
When resizing a light on the canvas or in the Render View, hold the Shift key to maintain the same energy output, regardless of the light's size. The light's intensity will automatically adjust as you scale the light. This is useful when you want to change the shadow softness (larger lights = softer shadows) without affecting the overall illumination levels coming from the light. Without holding Shift, scaling a light larger would normally make the scene much brighter.
Free Scale
Dragging the cursor left and right changes the width.
Dragging the cursor up and down changes the height.
You can move the cursor in any direction to change the width and height at the same time.
Brightness
Dragging the cursor to the left and right, decreases and increases the light brightness.
Spread
This is only shown for area lights. Dragging the cursor to the left and right, decreases and increases the area light spread.
Handle New in HDR Light Studio 8 Drop 2
Drag on the Canvas and Render Views to move the position of the handle on the selected light. This will result in the light sliding in relation to the fixed position of the handle. This can be used for making small adjustments to the position of the light without actually moving the LightPaint position. This can also be used to place the handle on the edge of the Light, allowing the light to be positioned using its edge.
Motion Blur
Shown only for lights with Motion Blur filter.
Render Views: Click to position the Motion Blur direction using the LightPaint method selected in the drop-down on the right.
Canvas: Click to position the Motion Blur direction on the Canvas.
Scrim Light Position
Shown only for lights with Scrim Light as 'main' content.
Render Views: Click to position the Scrim Light effect using the LightPaint method selected in the drop-down to the right.
Canvas: Click to position the Scrim Light effect on the Canvas.
Reflection Axis New in HDR Light Studio 8 Drop 2
Shown only for lights with Reflection filter.
Render Views: Click to position the Reflection Axis using the LightPaint method selected in the drop-down on the right.
Canvas: Click to position the Reflection Axis on the Canvas.
Designed for Keyboard Shortcuts
A faster way to change the LightPaint tool mode, in any UI panel, is to use a keyboard shortcut. These shortcuts are common across all UI panels in HDR Light Studio. These keyboard shortcuts are also used on the Scrim Light content.
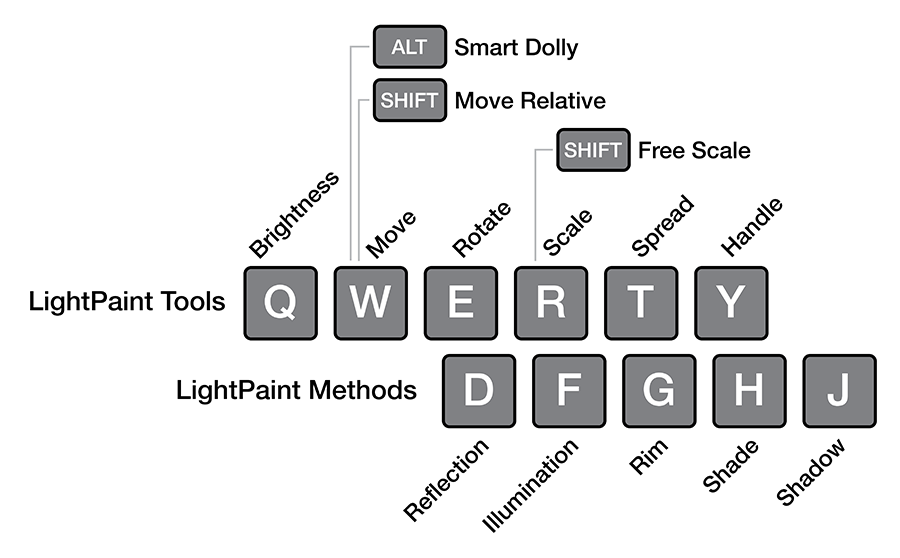
To change the mode, move the cursor to the view where you want to change the mode, then press the keyboard shortcut key/s and the mode will change in that view only. There is no need to hold down the key/s, the mode changes and stays in the new mode.
Each tool mode can have additional keyboard qualifier keys that you hold down whilst dragging in the view.
These are:
Horizontal Lock: Shift
Vertical Lock: CTRL
Fine Adjust (reduces sensitivity of adjustment): Alt
A LightPaint mode per UI panel
The LightPaint mode settings are not global. Each panel has its own LightPaint mode. This can be very useful, for example, you could use the Canvas with Scale mode, and a Render View with Move mode.... between the 2 views you can now move and scale lights - just by using the mouse in those views.
So, when using keyboard shortcuts for LightPaint modes, ensure the cursor is within the panel whose mode you want to change.
Cursors and Overlay Text
Each LightPaint mode has a different cursor, making it easy to know which mode you are in. In addition there is a text overlay giving you useful information about the mode, such as optional keyboard qualifiers for that mode.
When you are dragging in the view to adjust a setting, the overlay text will provide useful information about the adjustment being made. For example, when scaling the light, you see the % change you have made compared to the original value. So it's easy to double or half the size of a light, even without seeing the renderer catch up and update the view. This is ideal for Render Views that are not updating fast. You can still make the adjustment knowing the amount of change you made.
