New in HDR Light Studio - 8 Drop 1
What is an Scrim Light?
Settings Explained
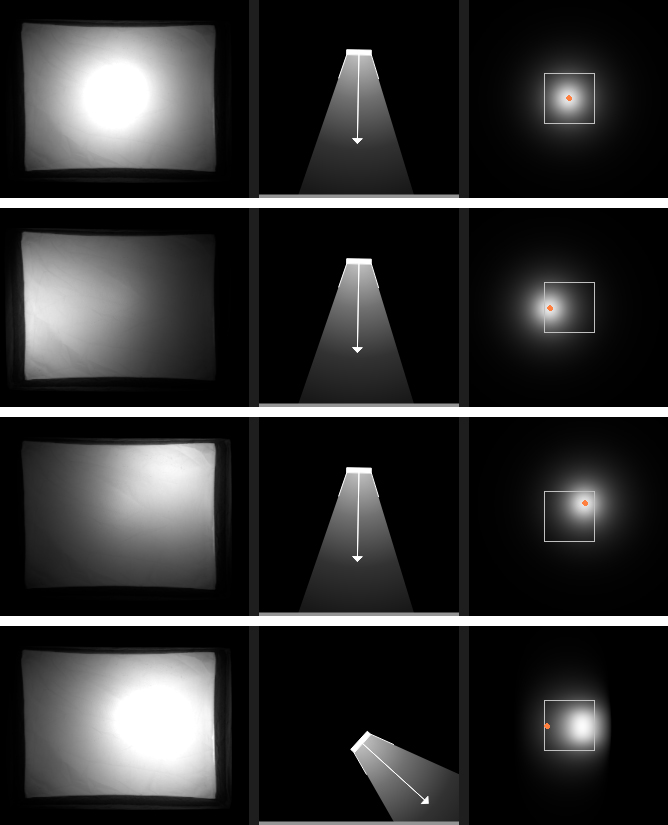
Scrim Light Examples
Using Scrim Light on Value Blend
Scrim Light mimics how a photographer would light in the studio (see image below) when shining a light source at the back of a sheet of material. The Scrim Light in HDR Light Studio produces a very realistic light that is easy to adjust in a physical way. Most of the settings for this light can be controlled by dragging in 2D views of the light setup. This is far faster and more intuitive than using lots of sliders. The Scrim Light is the most advanced and controllable procedural light available in HDR Light Studio - and can produces a huge range of realistic lighting effects.
")
This perfectly shows the concept behind the Scrim Light. See the spot light placed behind the sheet of material (outlined red)
Settings Explained
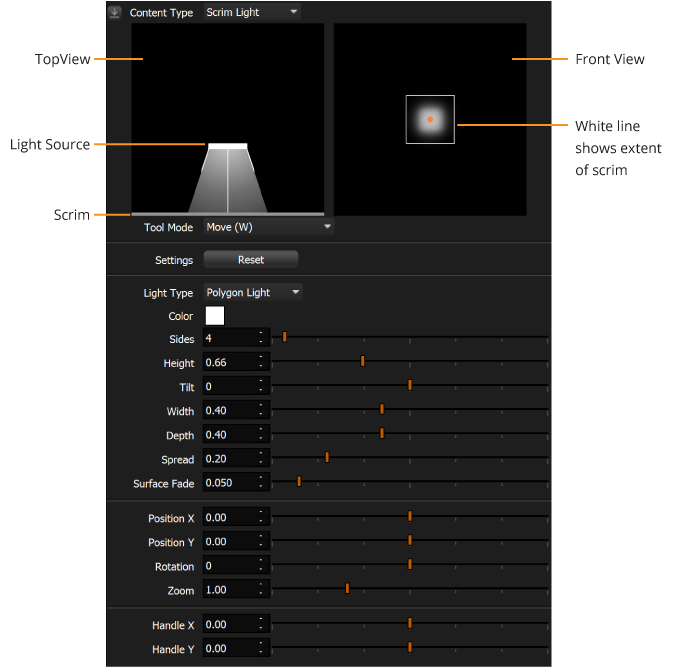
Top View
This view shows the top view of the light in relation to the scrim surface. This view provides a user interface for controlling the light.
Dragging in this view will change the light's settings using the active Tool Mode. For example, using 'Move' tool mode, dragging in the view will change the height of the light.
Front View
This view shows the lighting effect created by the light source on the scrim. Only the region outlined in white is used for the appearance of the light. This view also provides a user interface for controlling the light. Dragging in this view will change the light's settings using the active Tool Mode. For example, using 'Move' tool mode, dragging in the view will move the position of the light source.
Tool Mode (for Top and Front views)
Use the drop-down to change how the mouse interactions change the light source settings.
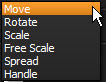
When the cursor is over the Top or Front View - the tool mode can also be changed using keyboard shortcuts shown in the chart below. (These keyboard shortcuts provide the same functionality in the Render Views and Canvas, when the cursor is over those panels.) The chart also shows how the mouse input controls the Scrim Light.
Tool / Keyboard Shortcut |
Top View |
Front View |
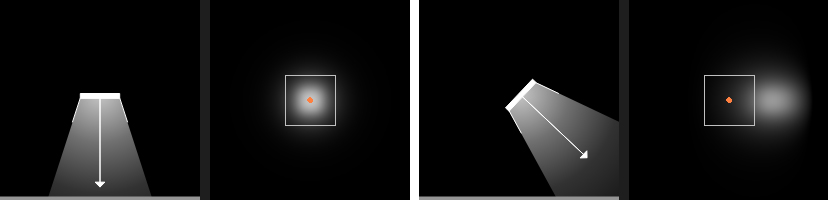
Move W |
Drag to move the light up and down |
Drag to move the position of the light |
Rotate E |
Drag to change the tilt of the light |
Drag to rotate the light |
Scale R |
Drag to proportionally scale the light |
Drag to proportionally scale the light |
Free Scale Shift + R |
Drag up and down to change the depth of the light |
Drag up and down to change the depth of the light |
Spread T |
Drag to change the spread of the light |
Drag to change the spread of the light |
Handle Y |
- |
Drag to move the position of the light handle |
Settings - Reset Button
Pressing the Reset button will return all values on the Scrim Light to their default values.
Light Type

Left: Quad Light Right: Spot Light
There are 2 types of light available to place behind the scrim - Polygon Light and Spot Light
The Polygon light has an adjustable number of sides - from 3 to 25. The default is 4 sides, basically a quad light. If the number of sides are increased to 25 - this effectively provides a circular light.
The Spot light projects a beam of light adding a falloff ramp in the settings to control the brightness from the center to the edge of the beam.
Color
Sets the color of the light.
Sides (Polygon light only)

Changes the number of sides for the Polygon light source.
Height

Changes the distance the light source is from the scrim.
Tilt
Changes the angle of the light relative to the scrim.
Width and Depth (Polygon Light only)

Changes the size of the Polygon light.
Spread

Changes the spread angle of light emitted for both Polygon and Spot lights.
Surface Fade

There is an invisible clipping plane above the scrim surface. This setting changes the height of this clipping plane, and allows the softening of harsh light edges seen when the light is close or touching the scrim.
Position X and Position Y

Controls the location of the light in the front view.
Rotation

Rotates the orientation of the light in the front view.
Zoom

Allows the scaling of the light effect in the front view using a single zoom setting. Ideal if you have the light look settings you want, but want to simply scale everything.
Handle X and Handle Y
You can use LightPaint in the Render Views and Canvas to control the position of the light relative to the scrim. The handle (orange dot shown in front view) is the position used by LightPaint to move the light. We need to be able to move the handle location because the position of the light does not always coincide with the lighting effect being produced by the light on the scrim.
Falloff (Spot light only)
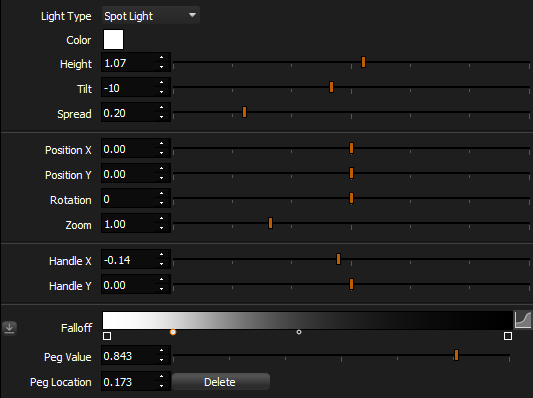
When the light type is Spot Light - the Falloff ramp is shown and can be used.

This ramp controls the brightness of the light from it's center (left on the ramp) to the outer edge (right on the ramp). Lots of lighting effects can be created this way.
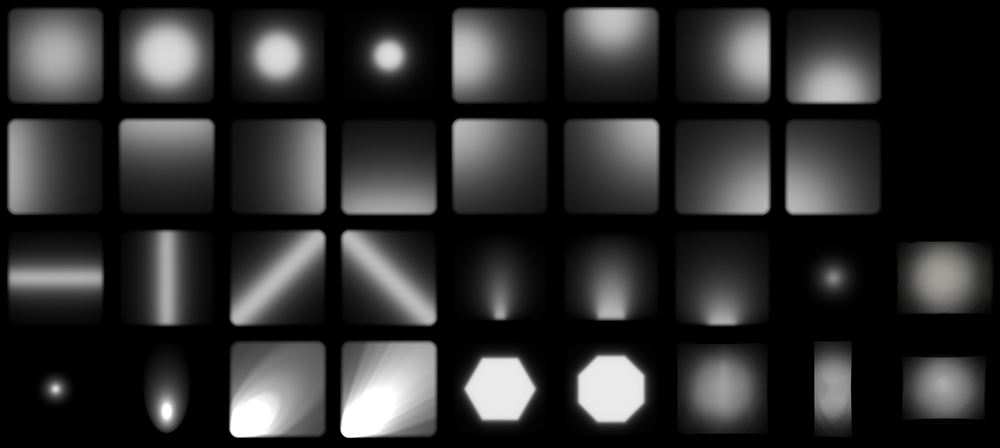
See how realistic these lighting effects are, they have a real photographic feel. It's amazing that all these effects come from this single light content type.
These Scrim Light designs are available in the Presets supplied with HDR Light Studio, so you can explore their settings.
These Presets include the Polygon content on the Alpha Multiply - this applies a small radius to the corners and adds softness to the edges.
Using Scrim Light on Value Blend
Scrim Light content is really useful to use on the Value Blend for a light.
In this example, we take a soft box light preset, with all of its interesting visual details, and apply the Scrim Light to the Value Blend choosing Multiply blend mode.
You can now control the character of the light by moving the position of the hot spot and adjusting the Scrim Light settings.
You can even position this hot spot directly on the 3D model using LightPaint to move the Scrim Light Effect.
Please Note: On Value Blend, there is an additional brightness slider added to the Scrim Light. This is needed to balance the brightness with the Main content on the light.