New in HDR Light Studio - 9 Drop 1
Introduction | Overview | Edit Mode | Advanced Falloffs | LightPainting Curve Points

This shows the key elements that determine the appearance of the Lumi-Curve.
The Lumi-Curve is controlled via settings on the Light Properties panel, but importantly the curve is drawn and edited using the pop-up Lumi-Curve Editor panel.
The 'Launch Curve Editor...' button opens up the Lumi-Curve Editor panel.

Lumi-Curve pop-up Lumi-Curve Editor panel and Light Properties
Why is this Light Pink by default?
By default a new Lumi-Curve is empty, as no curve has yet been drawn. However, you need to see the light in order to position it with respect to your 3D model - this is why we added the Bounding Box.
By default the Bounding Box setting is on. This adds a colored background to the Lumi-Curve output and you can change the color.
The Bounding Box can be turned off at any time and the background will be transparent.

Turning Bounding Box on and off
For this overview we will now leave the Bounding Box off.
If a curve has not yet been created, Lumi-Curve Editor panel opens in Create Mode with a pen cursor for drawing the curved line (called a bezier curve). This curve will be the center line from which the Lumi-Curve lighting effects will emit.
Click to add a point, whilst holding and dragging to control the direction handle (tangent handle) for that point.
In Create Mode, the placed points can't be edited. Approximately draw the curve you want and refine it later.
Use the main Undo button in HDR Light Studio to undo the last point created (or CTRL+Z), or you can click on the red cross to clear all points and start again.
Once the curve has been completed, click on the green tick to accept the curve and progress to Edit Mode.
Edit Mode
In Edit Mode, a toolbar appears with tools for editing the curve. (Learn more about the Tools here)
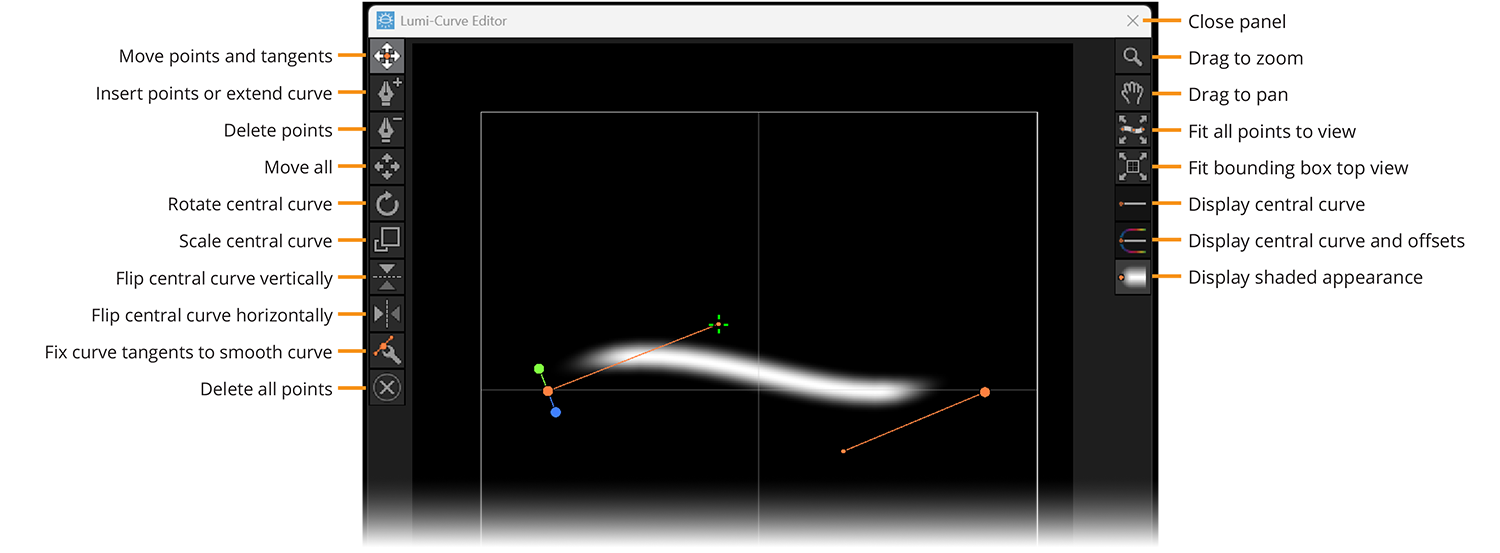
Going into Edit Mode, the display mode of the Lumi-Curve changes automatically from Central Curve to Shaded Appearance. This reveals the true appearance of the Lumi-Curve - showing the graduation from the central curve to the offsets.
By default the Move points and tangents tool will be selected.
Overlaid on the appearance of the Lumi-Curve are user interface elements for controlling the curve.
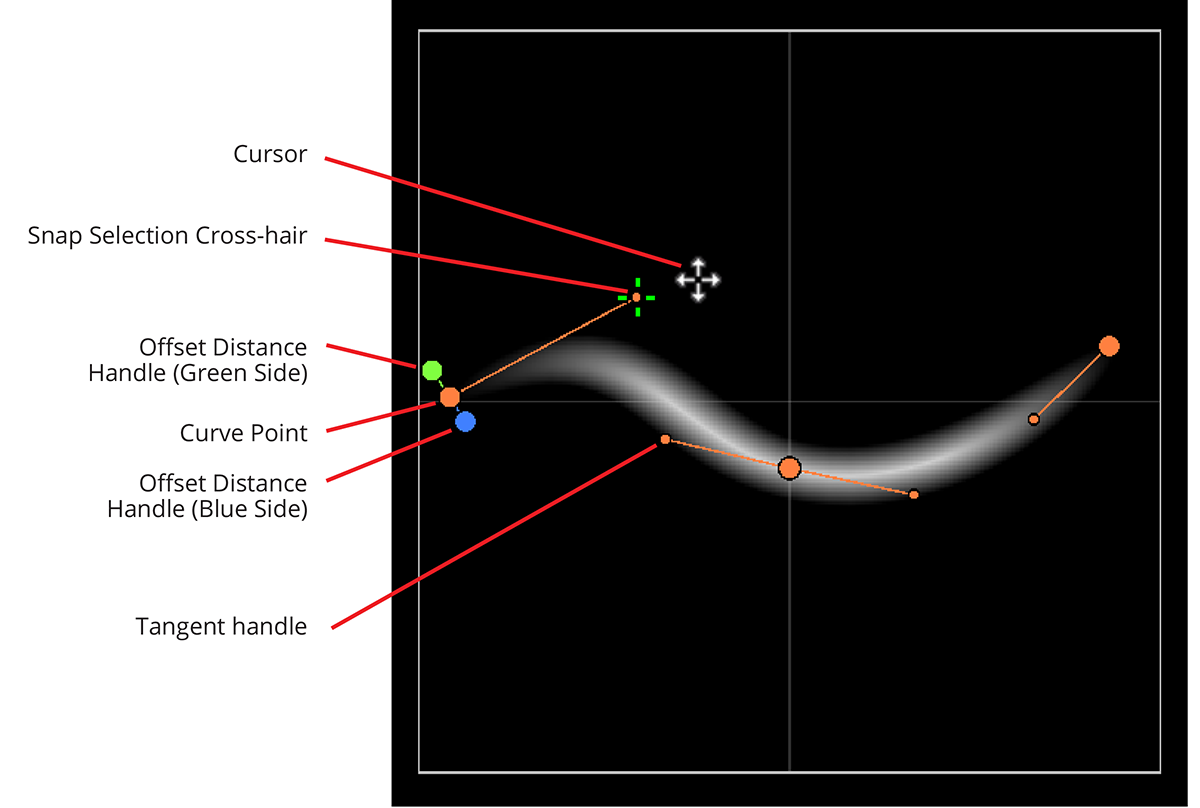
Snap Selection Crosshair
As you move your cursor around the panel, a crosshair automatically snaps to the nearest control point. Simply click and drag to move whichever point the crosshair is highlighting. This snap selection system saves time when editing the curve, as you don't need to be precise about your selection.

Snap Selection of points
Adjusting the Curve
The center line of the curve is adjusted using the orange control points - moving its points and tangent handles.
Dragging the green handle will adjust the falloff offset distance on that side of the line. Dragging the blue handle will adjust the falloff offset distance on the other side of the line.
We refer to them as the green and blue sides, as there is no concept of 'up and down', or 'left and right', as this all depends on the curves orientation. So we color coded each side of the line.

Dragging green control point increasing the falloff distance on one side of the curve
As you are adjusting the Lumi-Curve, the appearance of the light is updated in real-time and you can see the results of your edits on the 3d model as you are designing the lighting effect.
You can change the display of the Lumi-Curve. Sometimes it's helpful to see the colored outline of the offset extents to see which part is reflecting where in your model, or to see just the center line.

Changing the display mode to show Center and Outer Line
Properties Panel
The Lumi-Curve has other settings to control its appearance that live in the Light Properties panel.
Roundness

Each end of the Lumi-Curve has a roundness setting. This determines how 'rounded' each end of the curve is. The curve remains the same length and the roundness travels inwards along the curve.
To make a fully round light effect - you can increase the settings to 0.49 and 0.49.
If both settings add up to more than 1, there will be problems with the appearance as the roundness from each end will be overlapping.
Falloff (Ramp)
There is a graduation of brightness from the central curve to the offsets each side. This graduation is controlled by the falloff ramps. By default the falloff is symmetrical each side of the line and controlled one ramp.
The ramp is labeled Falloff (Green) as it relates to the green offset side. If the Symmetrical checkbox is turned off, there are separate ramps for the green and blues sides. Learn about non-symmetrical falloffs here.

The best way to edit the falloff, that provides the most control, is using the graph button to open the editor.

Editing the Falloff
Length Ramp
The length ramp is a brightness multiplier from the start to the end of the curve. By default this ramp is solid white and therefore has no effect.

Length Ramp enables a fade effect on the ends of the line, and allows precise control over brightness at all points along the length.
The best way to edit the length ramp is using the graph button to open the editor.

Adjusting the Length Ramp
Offset Types

The outer edges each side of the curve where the falloff ends is called the Offset. Various methods have been provided for automatically generating these offsets. The default setting is Line Normal.
Line Normal
The algorithm will do its best to try and make a curve 'equidistant' from the center curve. There are numerous situations where this can be difficult to generate, where the center curve has a small tight radius for example, and you can get unintended overlapping effects. This method provides a great starting point and can always be edited in Freeform mode later.
Vertical
The offset curves are identical to the center curve and offset vertically.
Horizontal
The offset curves are identical to the center curve and offset horizontally.
Angle
The offset curves are identical to the center curve and offset by a distance with the addition of an angle setting.
Freeform Offset

Turn on Freeform Offset and the automatic generation of the offsets is turned off - giving you full control over all control points and tangent handles. This provides a huge amount of control to shape the lighting effect into a wide range of different appearances.

Freeform Offset
If you turn this setting off, the Offset Type will take over the offsets and auto-generate them again.
This concludes the overview of Lumi-Curve.
