Elements are properties settings used within Content.
HDR Light Studio is supplied with a wide range of Element Presets, and you can save your own Element Presets too.
You can batch import images as Presets, an ideal way to add lots of HDRI maps or new HDR Lights to your Presets library - see here
Please note the new M,V,A buttons on the Preset panel. They are a key new feature controlling how Content Presets are applied to lights.
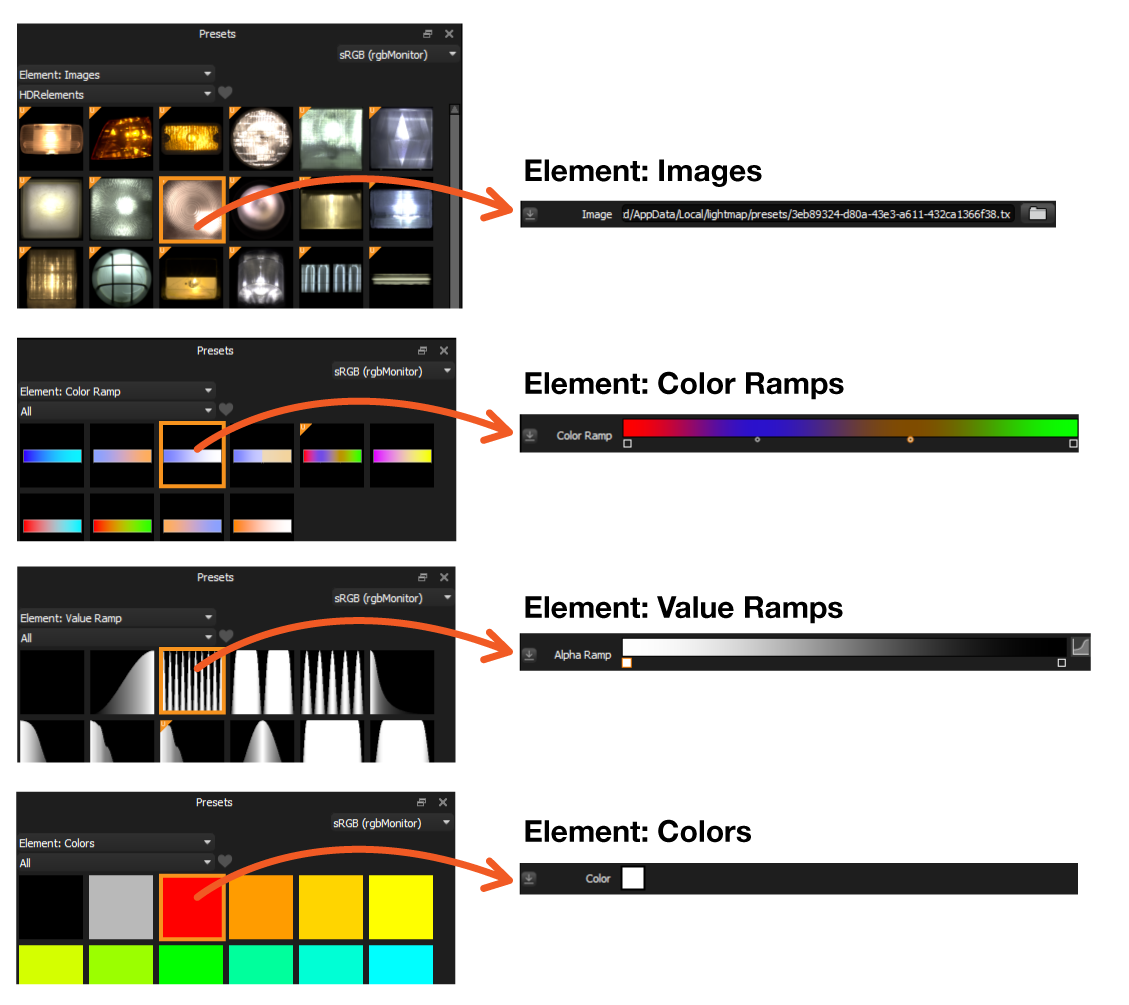
There are 4 types of Element Presets to choose from:
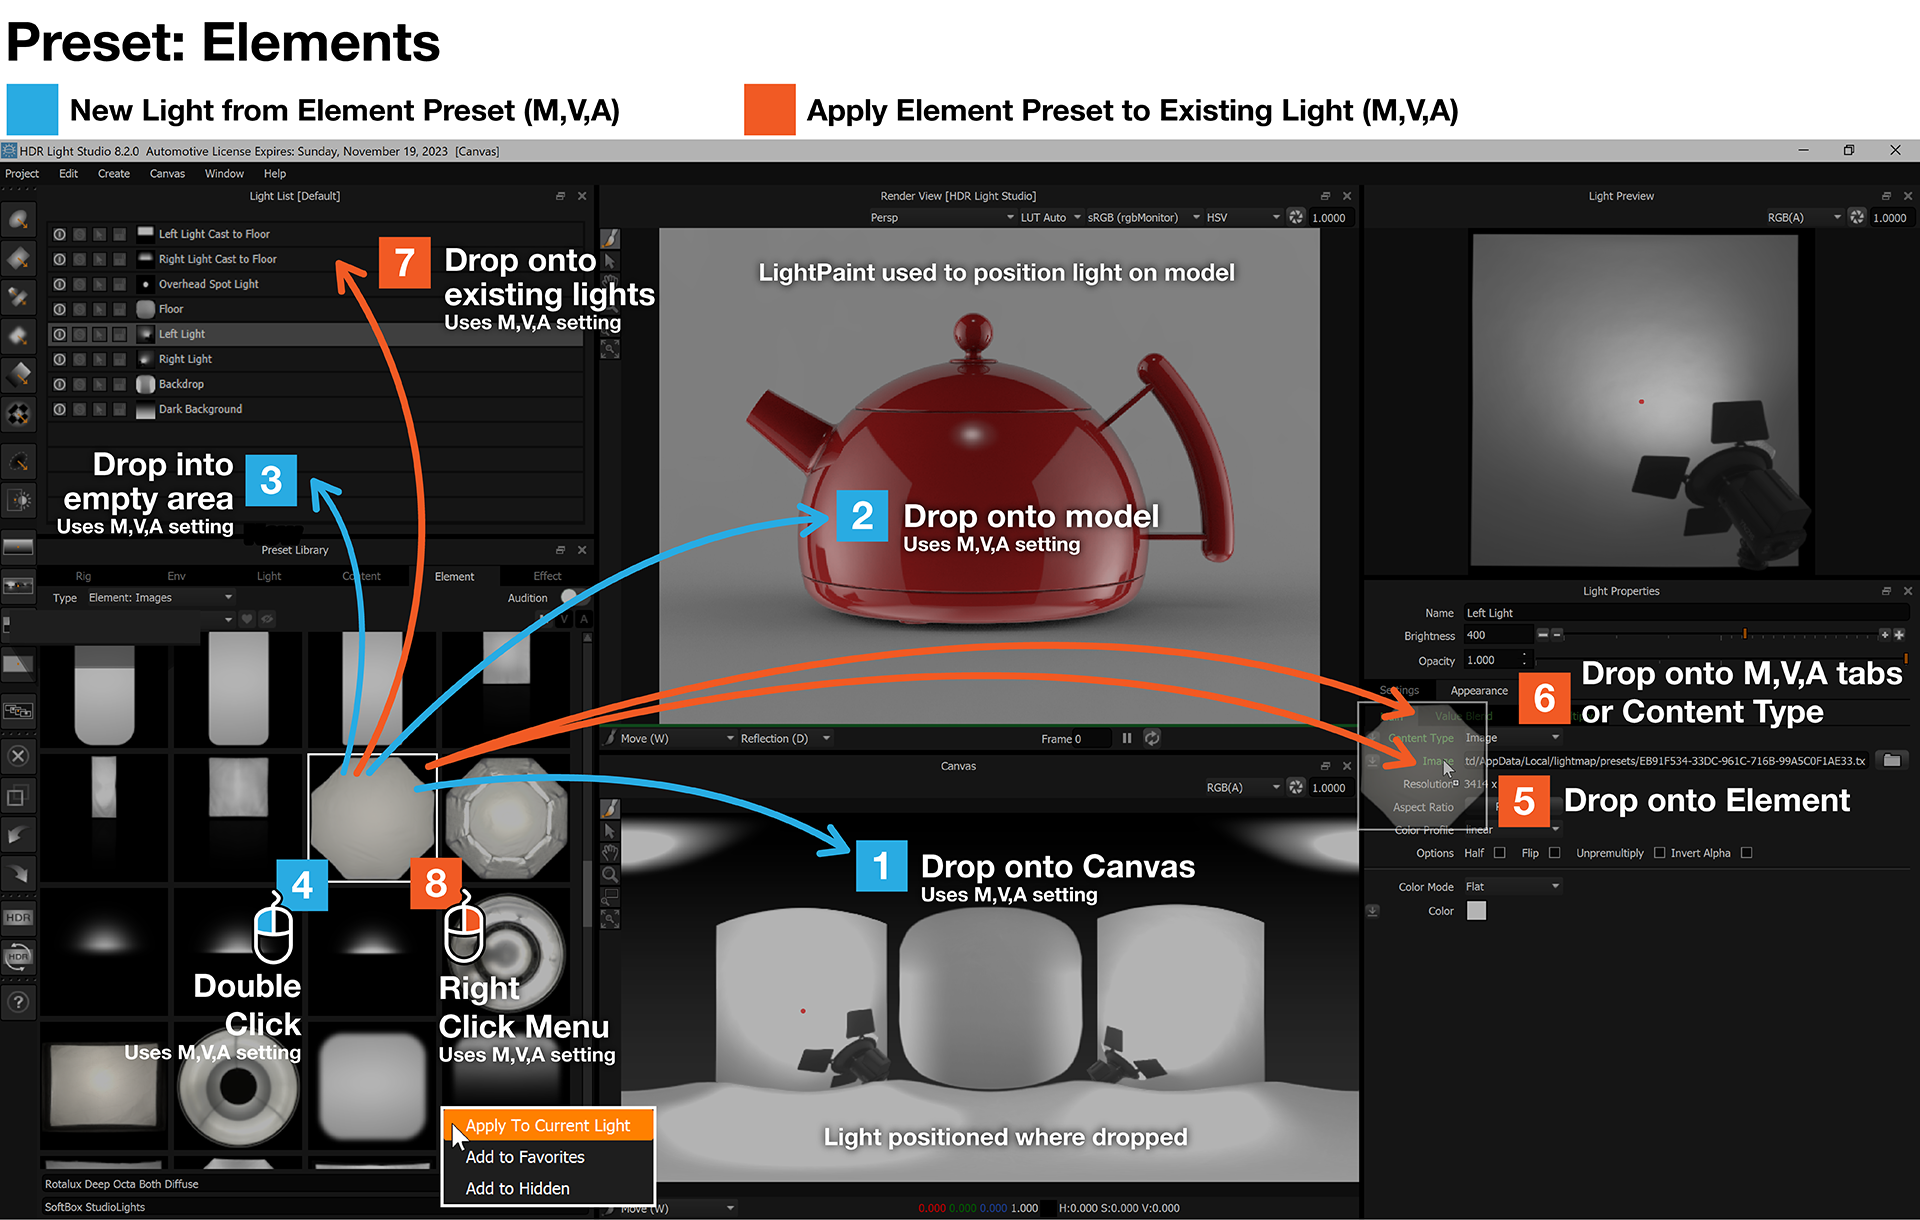
It may seem weird at first, but you can use an Element as the basis for making a new light. This is especially useful when working with Images. If you drag and drop a batch of images into the Presets panel, they get added as Element: Images Presets. So we have provided these convenient ways to make new lights directly from Element Presets where possible.
Behavior for creating new lights from Elements:
Element: Color Ramps will create a new light with Gradient Content and apply the preset to the Color Ramp
Element: Colors will create a new light with Flat Content and apply the preset to the Color
Element: Images will create a new light with Image Content and apply the preset to the Image slot
Element: Value Ramps cannot be used to make new lights and can only be applied directly to existing value/alpha ramps.
1. New Light - Drag and Drop onto the Canvas (Color Ramps, Colors, Images) (Changed in 8 Drop 2)
You are offered a choice of creating a '3D Light' or 'Background Light', once a choice is made, a light is created using the preset. (unless you are on the Env tab and all lights are created as Background Light)
For a 3D Light, the new light is positioned where the Preset was dropped. For a Background Light, the new light is always positioned centrally filling the canvas.
The element will create content on either Main, Value Blend or Alpha Multiply based on the active M,V,A button in the Presets panel.
2. New Light - Drag and Drop onto a Render View. (Color Ramps, Colors, Images) (Changed in 8 Drop 2)
You are offered a choice of creating a '3D Light' or 'Background Light' - once a choice is made, a light is created using the preset. (unless you are on the Env tab and all lights are created as Background Light)
A 3D Light will be created in the location where dropped using LightPaint.
A Background Light is created centered on the canvas.
The element will create content on either Main, Value Blend or Alpha Multiply based on the active M,V,A button in the Presets panel.
3. New Light - Drag and Drop onto a space in the Light List. (Color Ramps, Colors, Images) (Changed in 8 Drop 2)
You are offered a choice of creating a '3D Light' or 'Background Light' - once a choice is made, a light is created using the preset. (unless you are on the Env tab and all lights are created as Background Light)
The light is created centered on the canvas.
The element will create content on either Main, Value Blend or Alpha Multiply based on the active M,V,A button in the Presets panel.
4. New Light - Double Click on the Preset. (Color Ramps, Colors, Images) (Changed in 8 Drop 2)
You are offered a choice of creating a '3D Light' or 'Background Light' - once a choice is made, a light is created using the preset. (unless you are on the Env tab and all lights are created as Background Light)
The light is created centered on the canvas.
The element will create content on either Main, Value Blend or Alpha Multiply based on the active M,V,A button in the Presets panel.
5. Apply to existing light - Drag and Drop onto the relevant Element field/property.
When dragging the Element Preset, locations where it can be applied on the Content settings will have their label text change to green.
6. Apply to existing light - Drag and Drop onto 'Content Tabs' or a 'Content Type' field. (Color Ramps, Colors, Images) (Changed in 8 Drop 2)
When dragging the Element Preset, Appearance Content Tabs and the Content Type text where it can be applied will have their text change to green.
Here is the logic of how the Element will be applied to the Content:
Element: Color Ramps
If the current content type contains a Color Ramp, the Color Ramp will be made active and the Preset Color Ramp will be applied to it.
If the current content type does not have a Color Ramp, the content type will be changed to Gradient, and the Preset Color Ramp applied to its Color Ramp.
Element: Colors
If the current content type shows a Color swatch, the Color Preset will be applied to it.
If the current content type shows a Color Ramp, the Color Preset will be applied to the active Color Peg.
If there is no location to apply Color on the current content type, the content type will be changed to Flat and the Preset Color is applied.
Element: Images
If the current content type is Image, the Image Preset is applied to the Image slot.
If the current content type is not image, the content type is changed to image and the Preset Image is applied to the Image slot.
All of the rules above may seem a bit over complex. But as a user, the logic gives you a lot more control using Element Presets. For example, you can change the color of any light easily, whether it has color settings or not. It will adapt to make sure you can apply a color setting from a Element: Color preset.
7. Apply to existing light - Drag and Drop onto a light in the Light List. (Color Ramps, Colors, Images) (Changed in 8 Drop 2)
The Element will be applied to either the Main, Value Blend or Alpha Multiply based on the active M,V,A button in the Presets panel, using the same rules as above.

M,V,A buttons
For reference, the chart below shows where the Element Types can be applied on a Light Appearance.
|
Main |
Value Blend |
Alpha Multiply |
Element: Color Ramp |
Yes |
|
|
Element: Colors |
Yes |
|
|
Element: Images |
Yes |
Yes |
Yes |
Element: Value Ramp |
|
|
|
Next: Auditioning Presets
