LUT Mode (New in HDR Light Studio 8.2)
HDR Light Studio uses OpenColorIO (OCIO) color management.

When the Render View displays an interactive render image coming from your 3D software, depending on the 3D software and renderer, a display LUT may or may not have already been baked into the image data. If a LUT has already been applied, you would need to manually change the color setting in the Render View to None every time you used HDR Light Studio. This prevented the double application of a display LUT that would display a brighter, washed out, and inaccurate render. Manually changing this every time was not an ideal workflow.
We have updated plug-ins to tell HDR Light Studio if a display LUT is already applied to the render image. With the new default LUT Auto mode, HDR Light Studio will automatically disable a LUT in the Render View for: Octane Standalone, Rhino, Omniverse and Unreal Engine. This LUT Auto setting can be overridden, and you can choose LUT On or LUT Off. With LUT Off, whatever the LUT drop-down on the right of it is set to, this will be ignored.
Please note: This setting is somewhat redundant for the RenderView(HDR Light Studio) and can be left at the default setting of LUT Auto.
LUT
Use the drop-down to select the LUT that should be applied (if the LUT mode on the left of it allows this).
The OCIO LUTs being used are set in the Preferences panel.

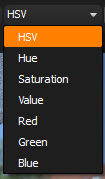
Display Channels
Allows the user to choose which image channels are displayed in the Render View. The default is HSV.

Display Exposure
The exposure controls let you adjust the brightness of the displayed Render View image. This will help you match the brightness with that seen in your 3D render software, so that you can roughly calibrate the Render View to your Renderer.

Exposure Control
Drag the icon button right and left to increase or decrease the exposure or type values into the text field. Double click on the icon to reset the value to 1.

Example of adjusting the Exposure of the Render View
