HDR Light Studio is a standalone lighting application, providing a set of tools and content dedicated to lighting 3D scenes. Using HDR Light Studio connected to VRED, provides the ability to create custom HDRI maps to light your scenes, with lights chosen and positioned to provide the perfect effect on your model. As you work with HDR Light Studio, the lighting is updated in real-time in VRED, where you can see the lighting interact with your 3D scene. New in VRED 2020.1, you can also create and control Area Lights using HDR Light Studio (Tungsten Drop 1 and higher).
This workflow tutorial will teach you how to use the connection between VRED and HDR Light Studio. It will not teach you how to use HDR Light Studio itself. Please see our 'Getting Started' content here to learn the HDR Light Studio interface and the basic features.
1. Starting HDR Light Studio Connection in VRED
If you already have a scene loaded in VRED and lit by an existing Environment, please skip to Step 5.
For those less familiar with VRED, you can start here.
STEP 1: Start VRED. Figure 1 shows what your screen may look like.
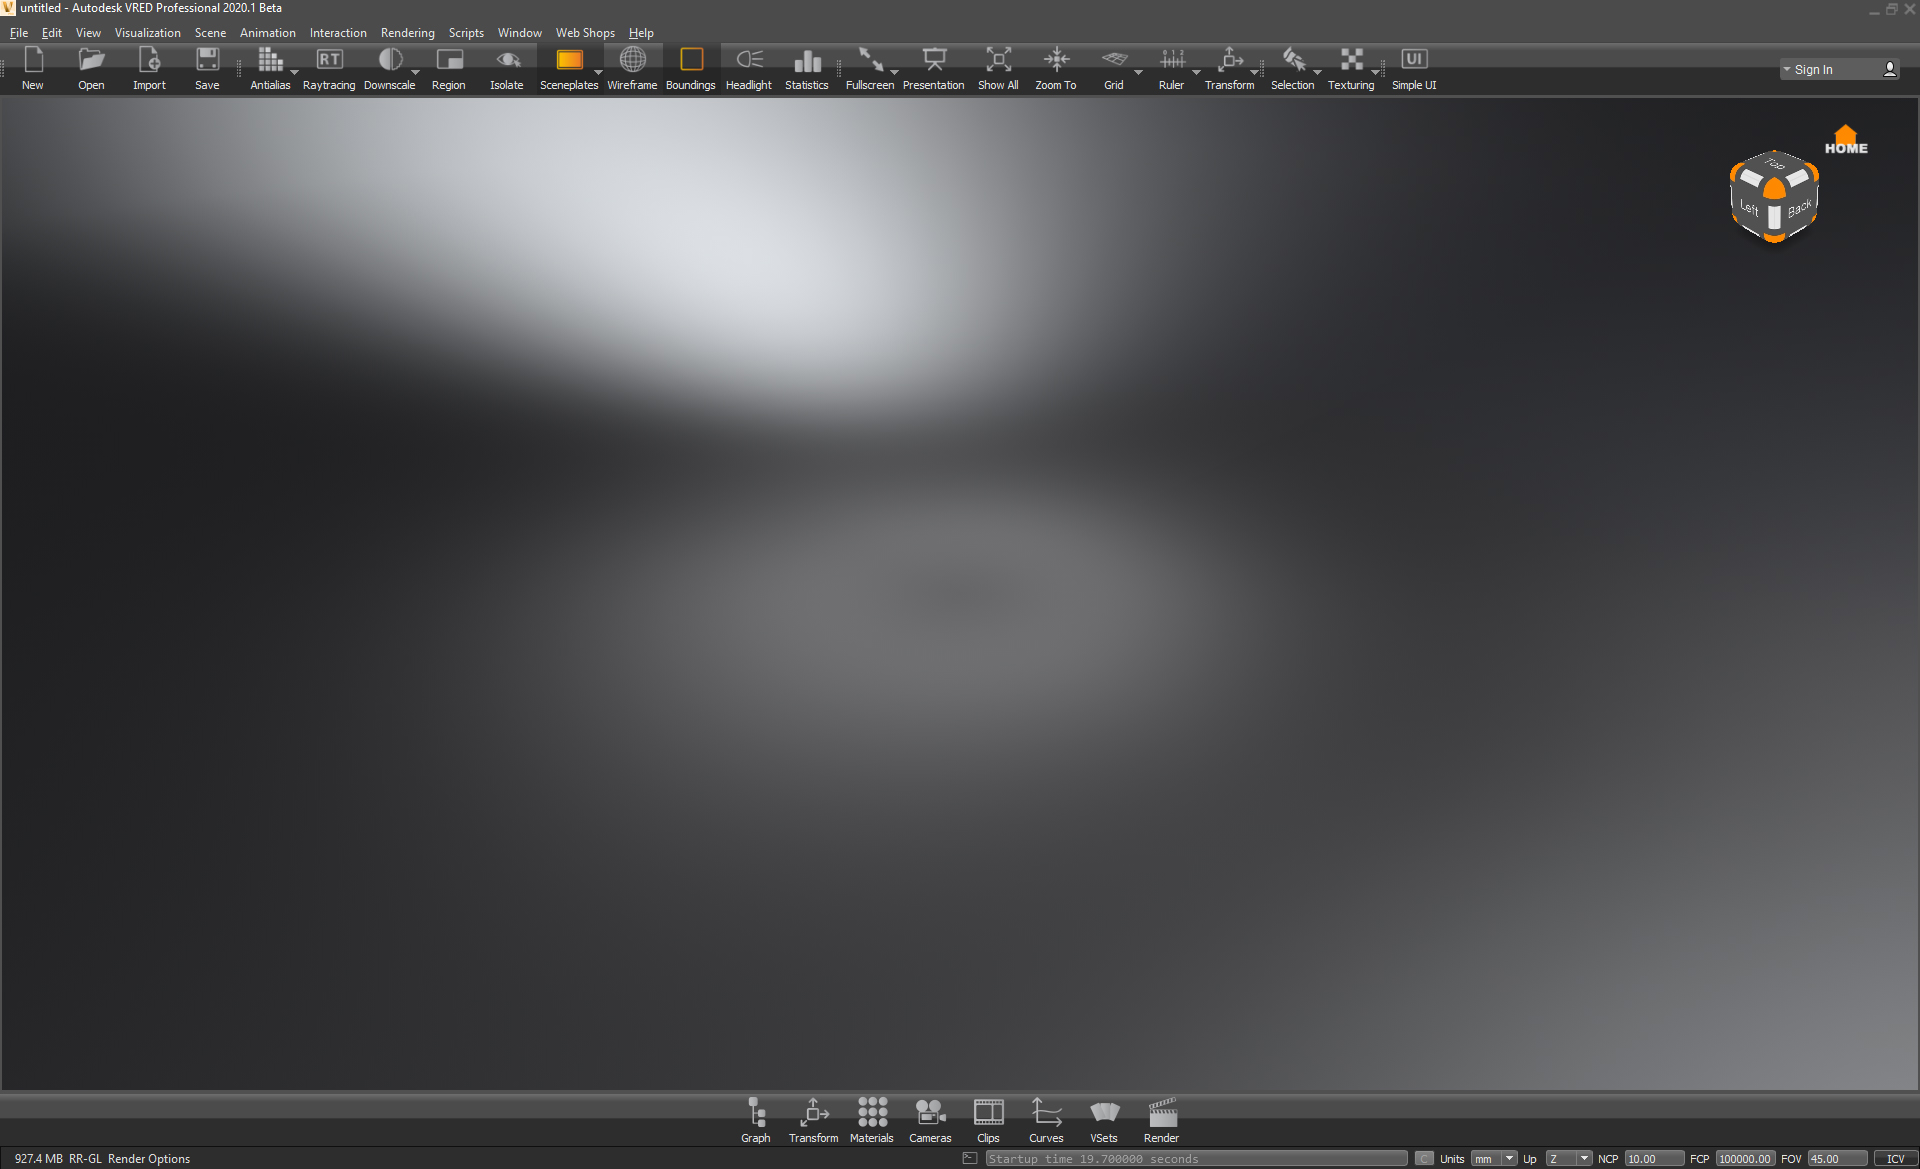
Figure 1: VRED 2020.1 on start-up
STEP 2: In the top toolbar go to File > Open to load your scene in VRED (see Figure 2) or hit Ctrl + O on the keyboard.
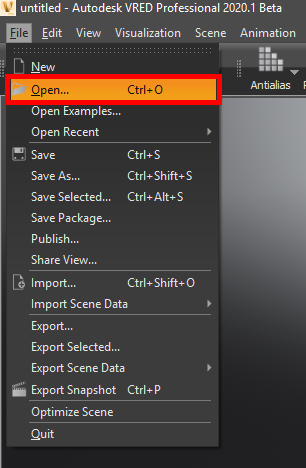
Figure 2: Loading a scene
In this workflow example, we are using an example scene that comes with VRED, 'Automotive_Genesis.vpb', which at default is stored in C:\ProgramData\Autodesk\VREDPro-12.1\Examples (see Figure 3).
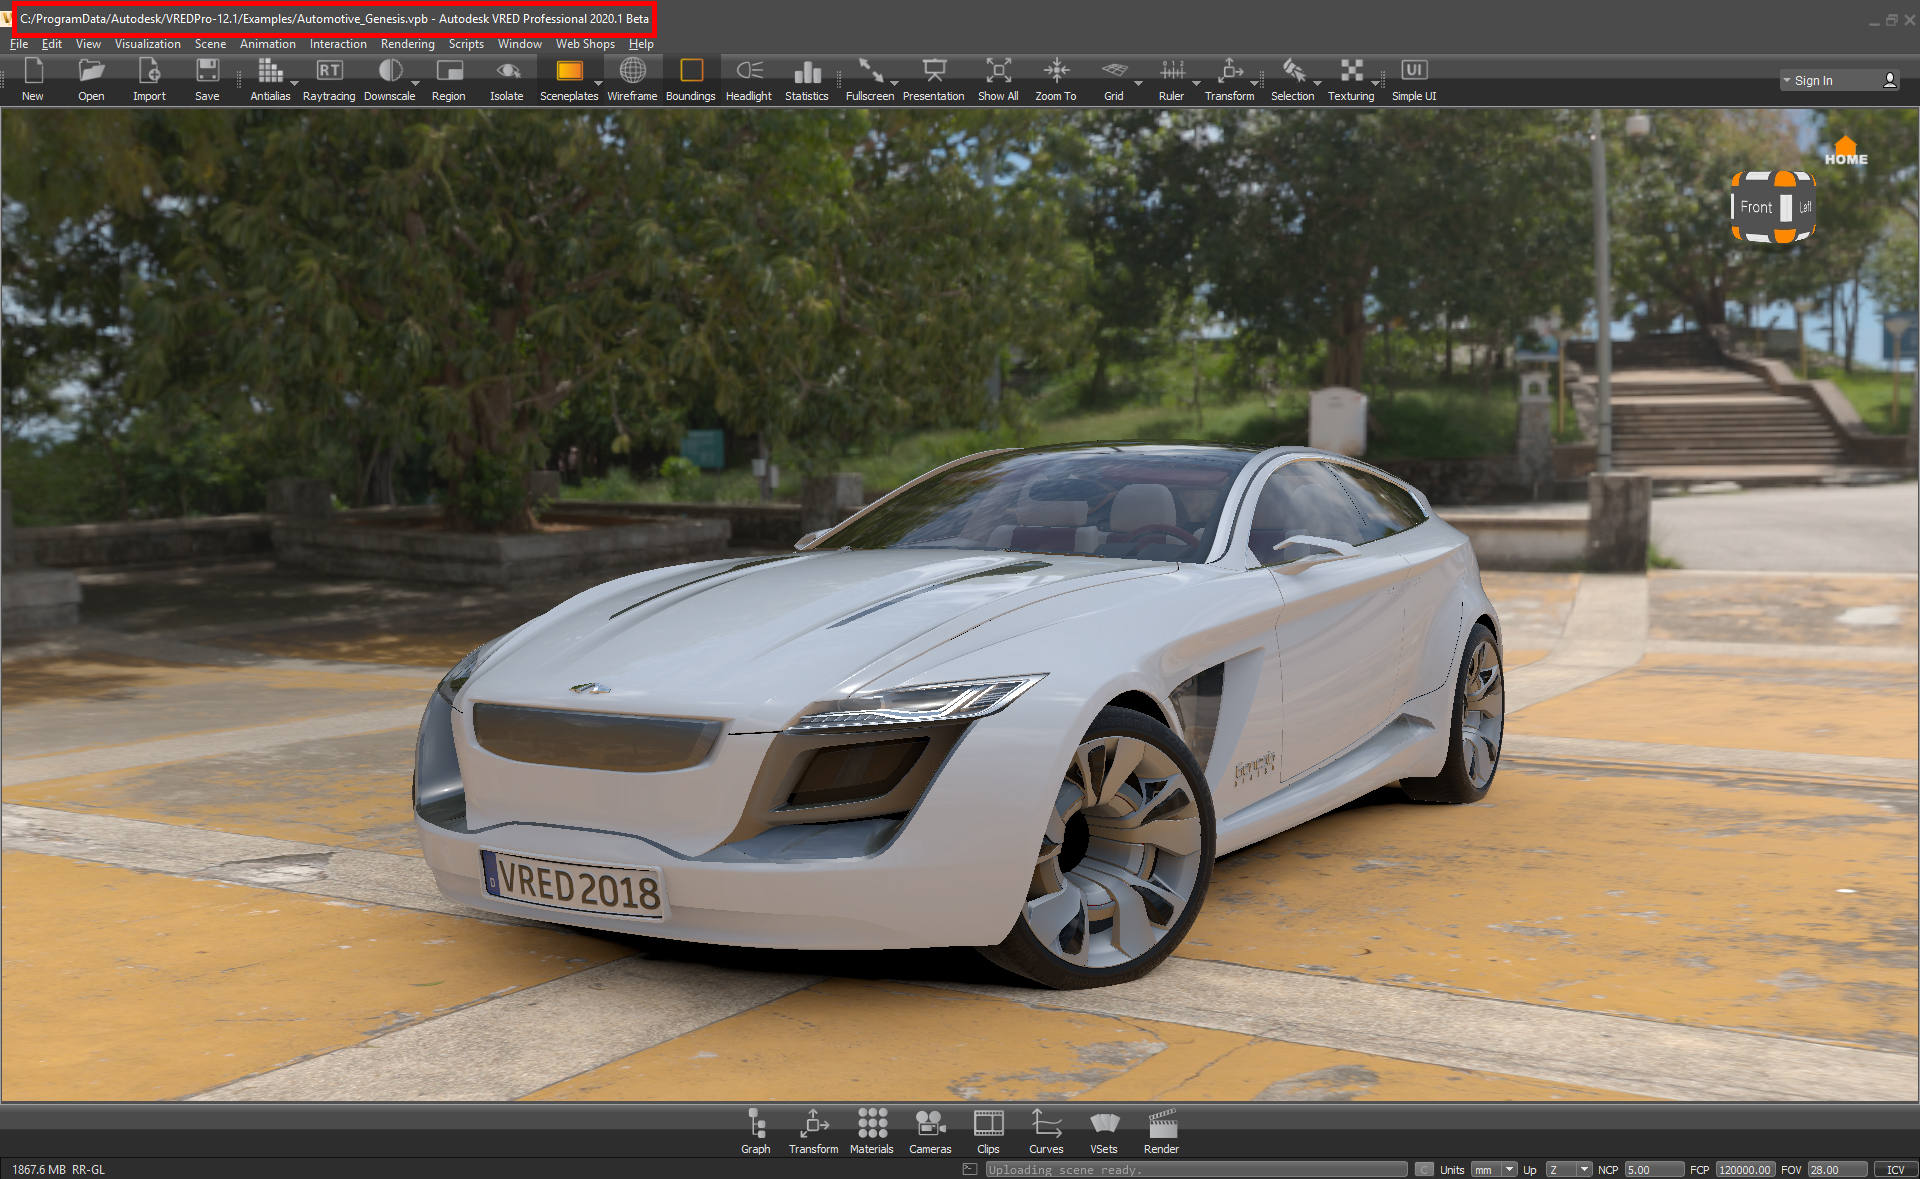
Figure 3: Loaded scene in VRED (Automotive Genesis)
STEP 3: Click on the 'Materials' icon in the bottom toolbar (see Figure 4) or in the top toolbar go to Scene > Material Editor (see Figure 5). This will open your 'Material Editor' (see Figure 6).
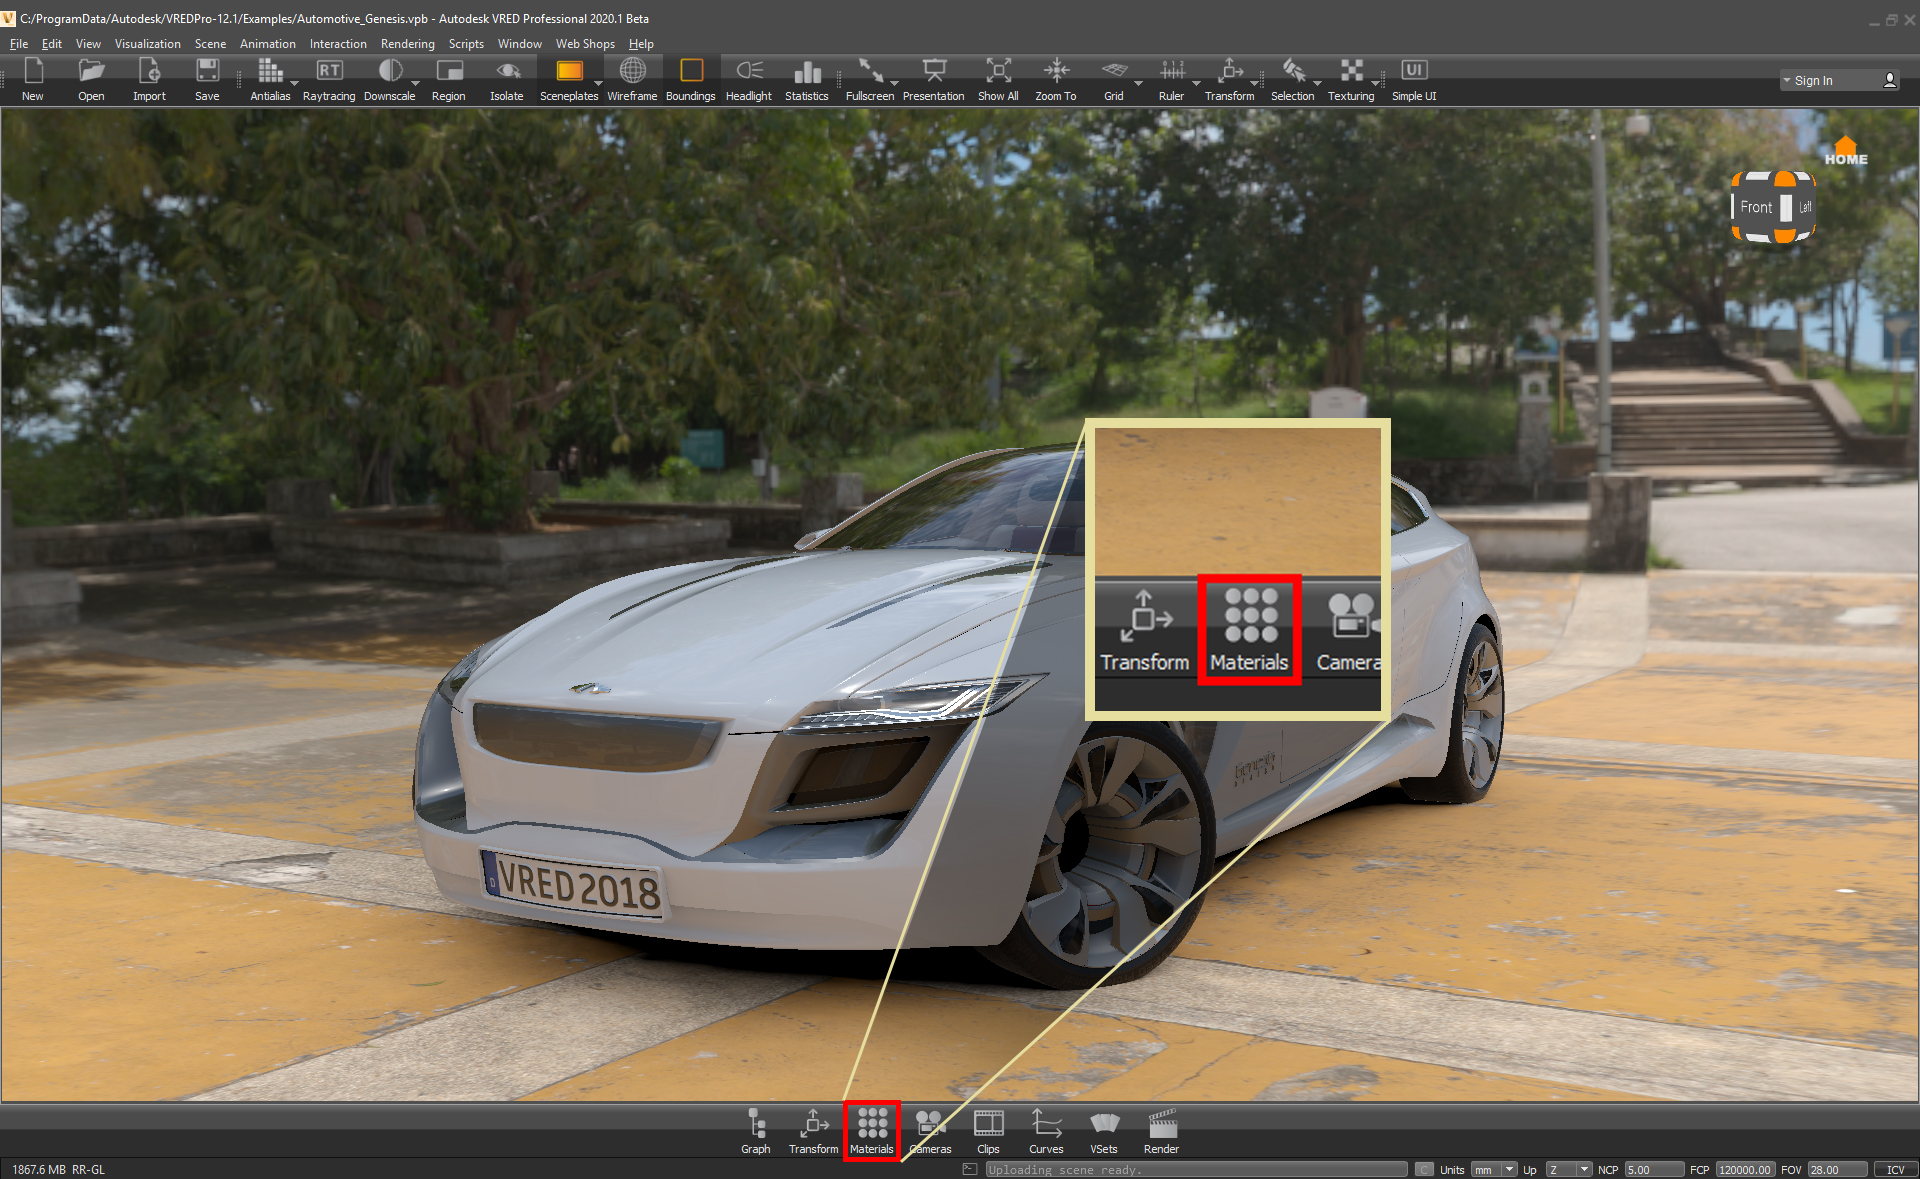
Figure 4: Opening Material Editor (method one)
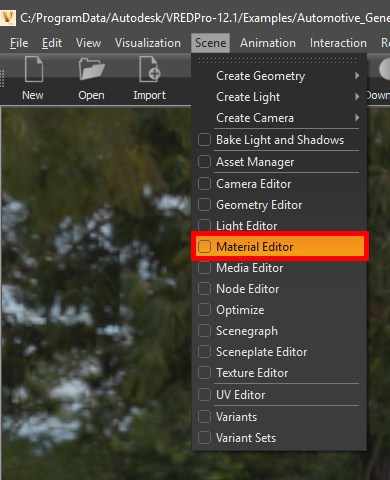
Figure 5: Opening Material Editor (method two)
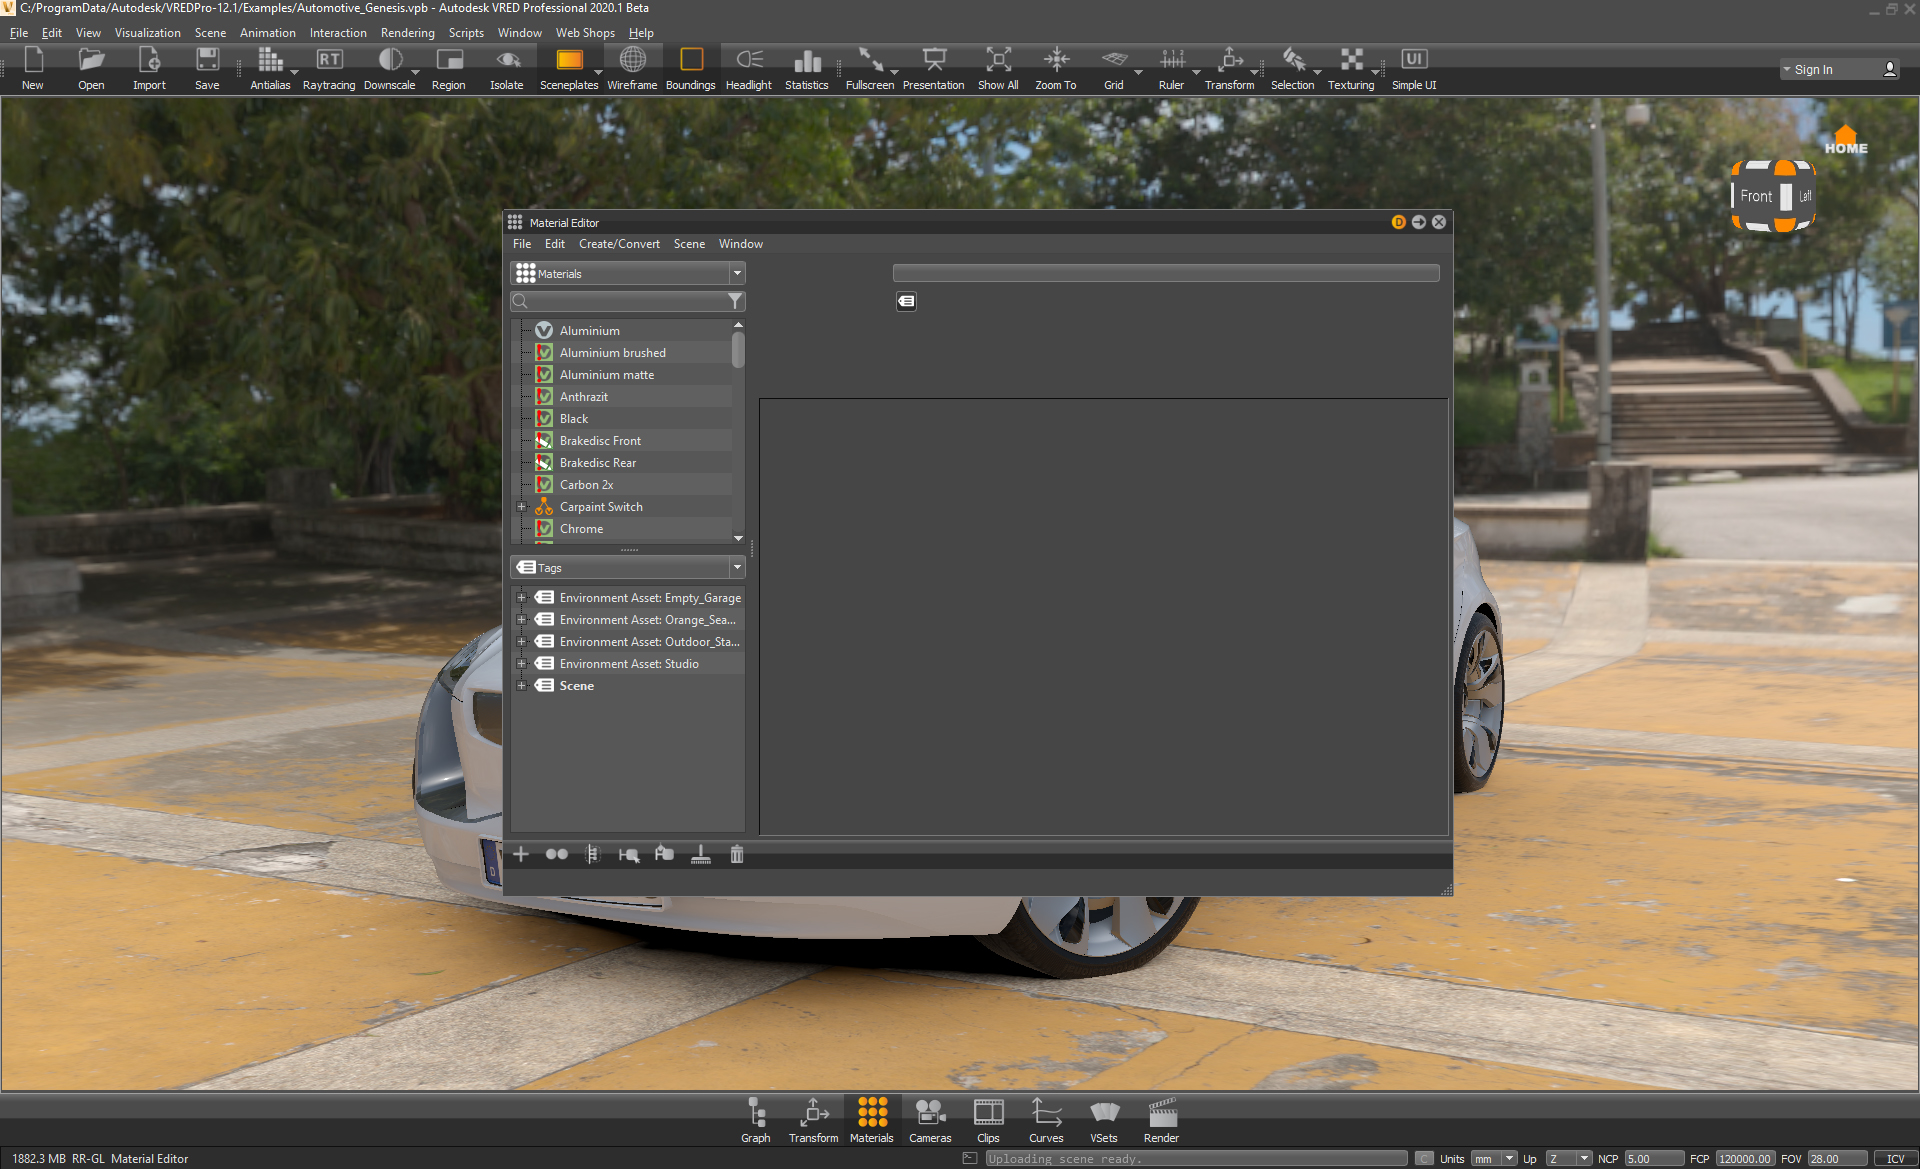
Figure 6: Material Editor panel
STEP 4: Move your mouse over the 'Material Editor' title bar and click/hold/drag the window to the side of the UI (see Figure 7), this will dock the window for your convenience (see Figure 8).
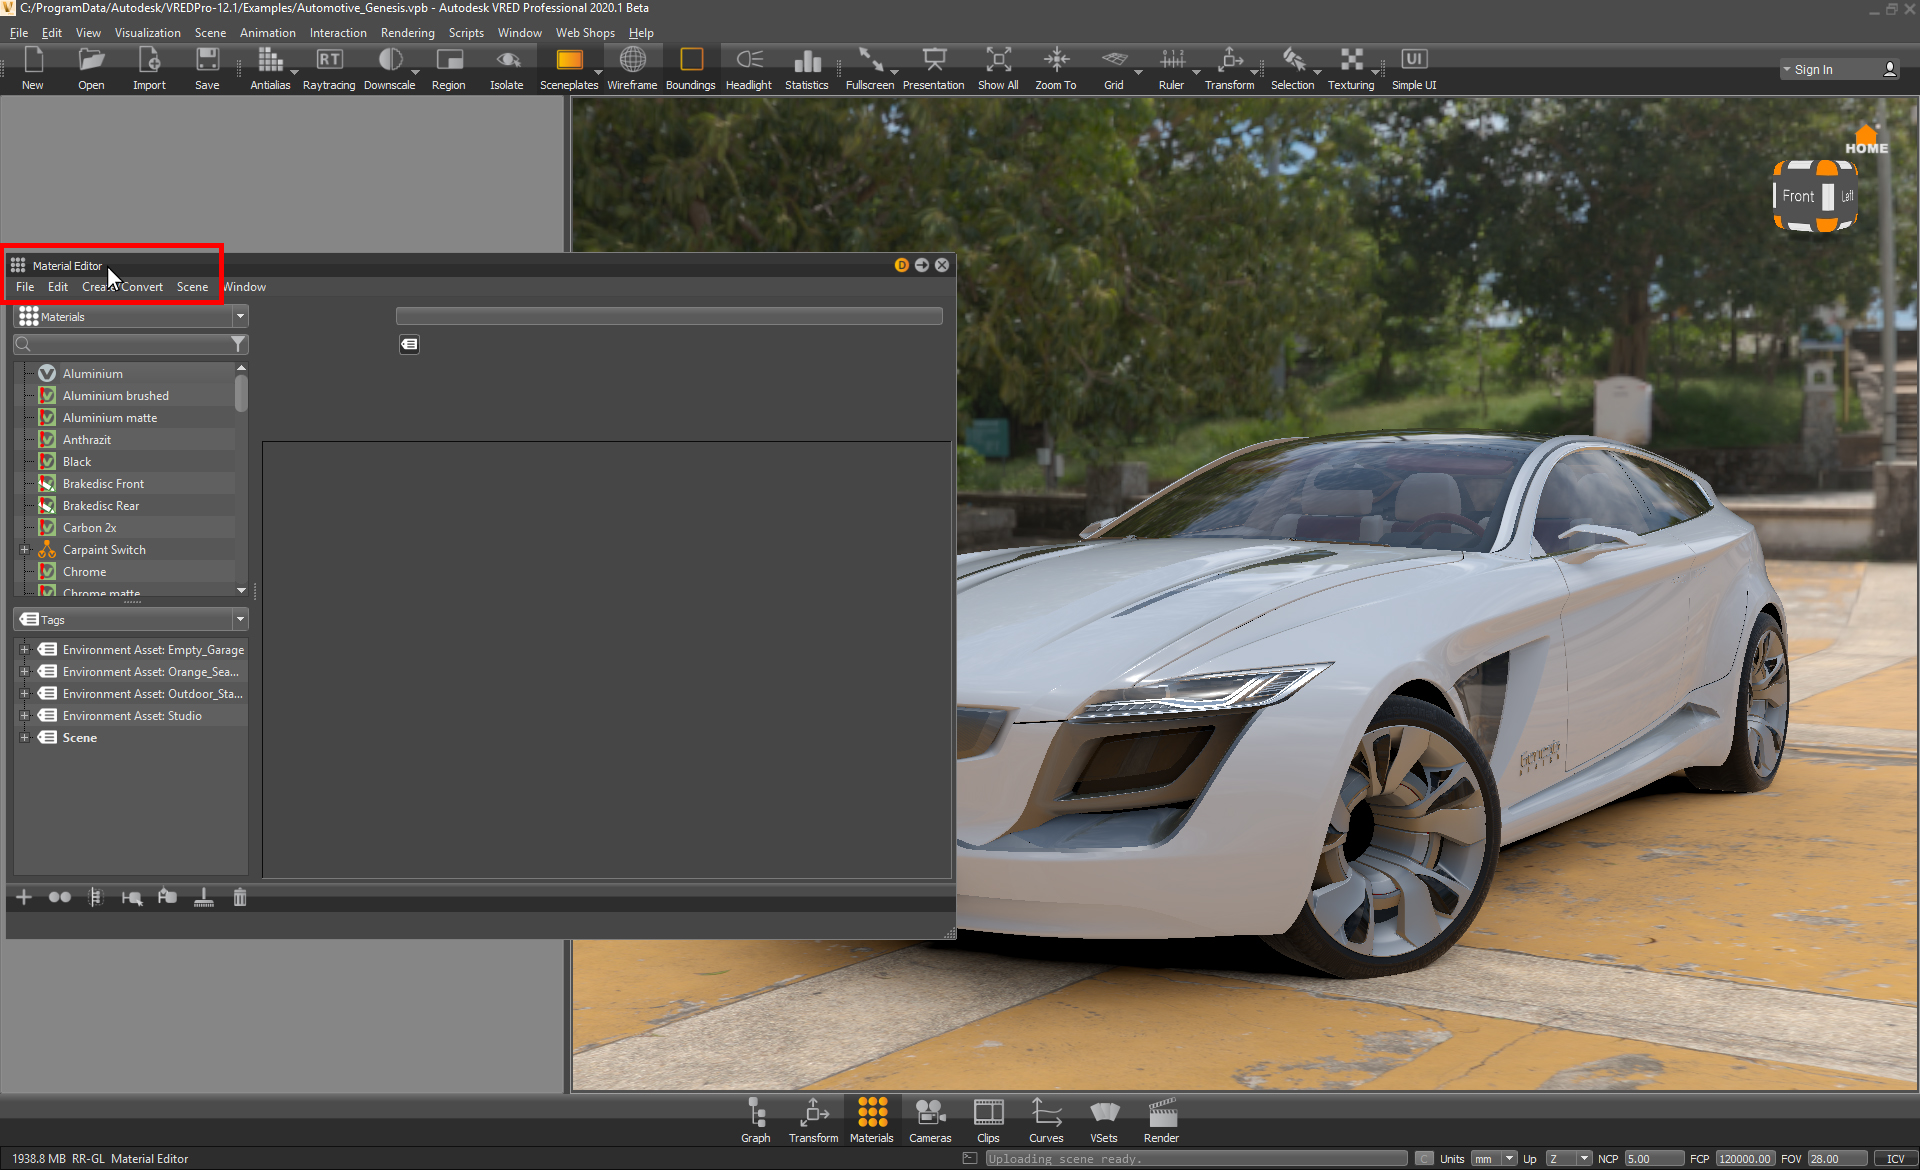
Figure 7: Moving the Material Editor window
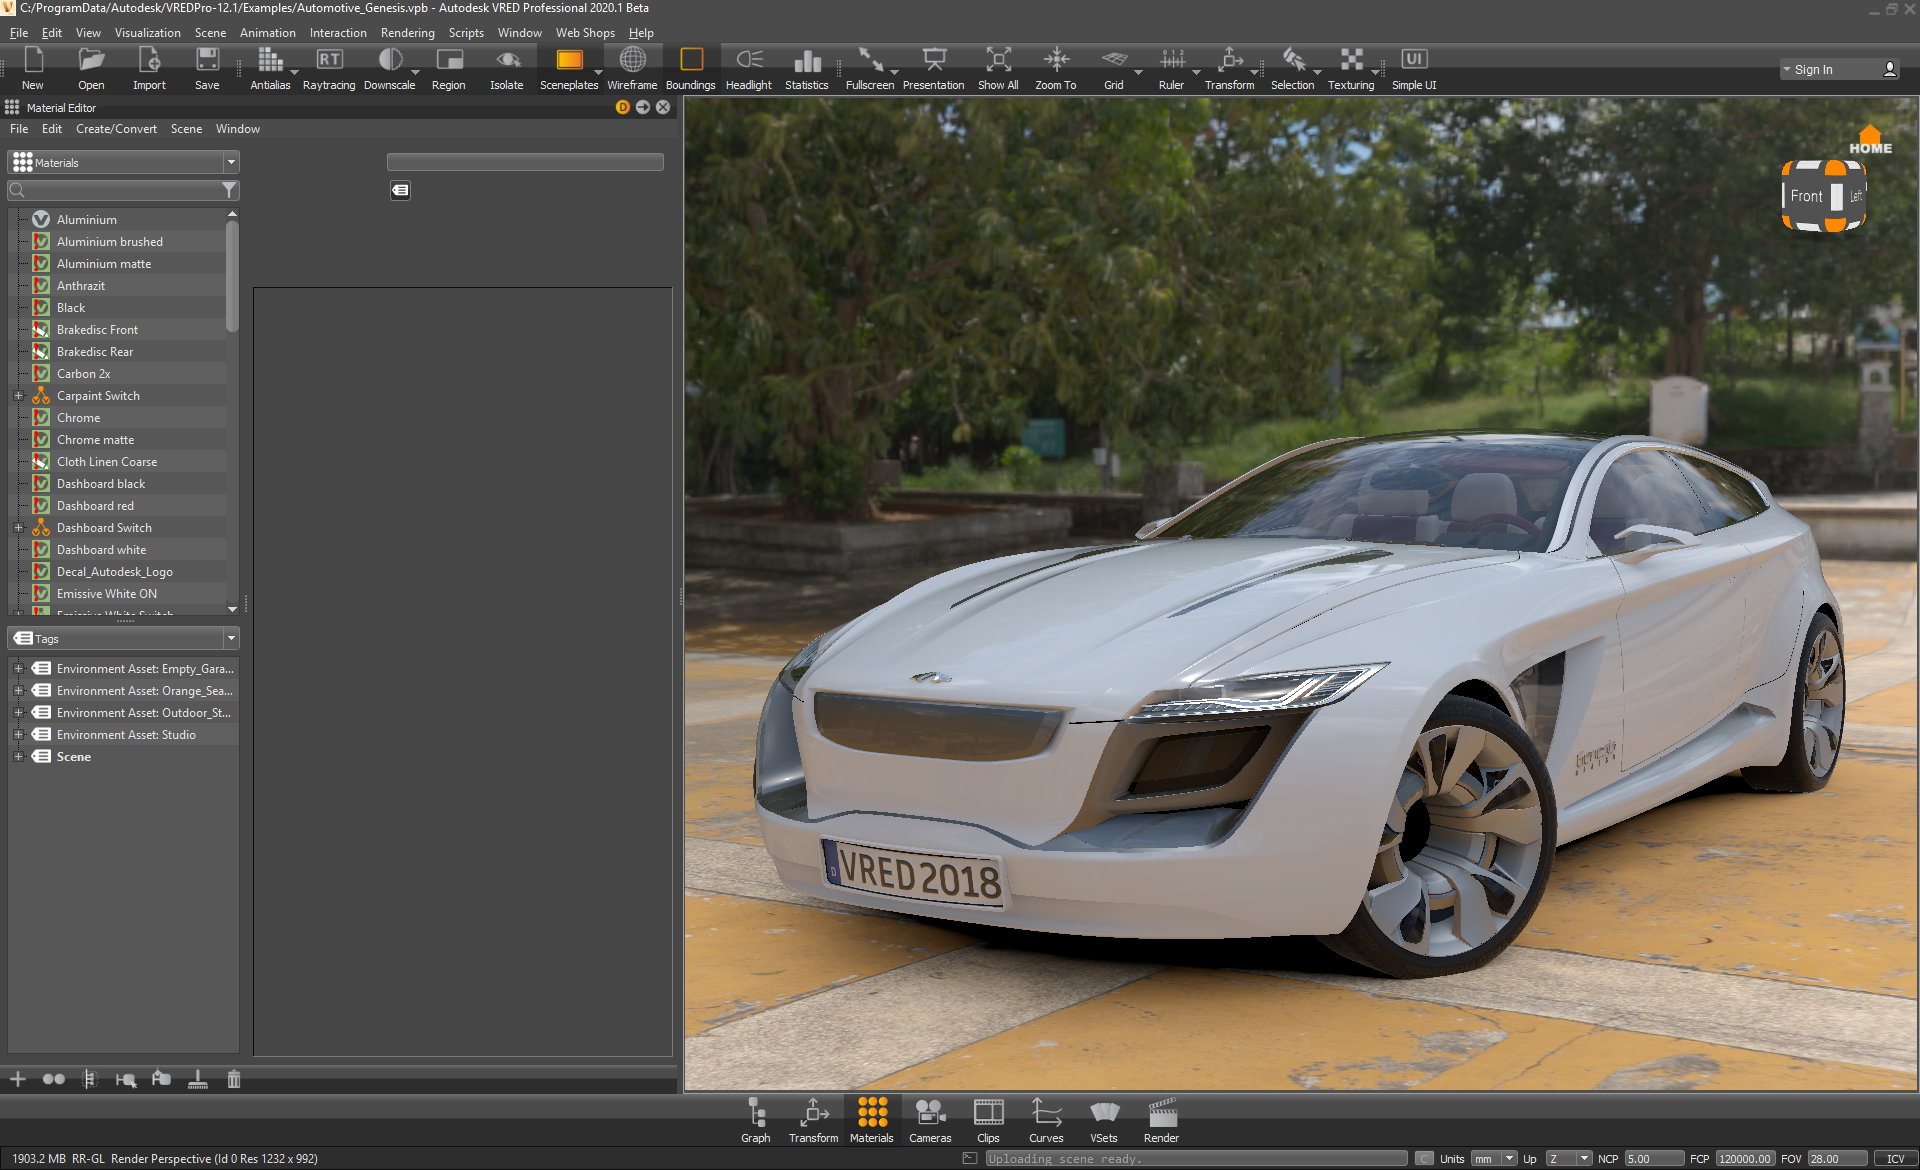
Figure 8: Material Editor docked to the side
STEP 5: When using HDR Light Studio connected to VRED, it will replace the HDRI file used by the current VRED environment with the HDR canvas seen in HDR Light Studio. When a change to the HDRI map design is made in HDR Light Studio, VRED is instantly updated with this new lighting. HDR Light Studio shares a low resolution HDRI of the lighting design (proxy) during the lighting design process. At the end of this process, the HDRI map is rendered by HDR Light Studio as a high quality and high resolution file on disk that is then used by the VRED environment.
HDR Light Studio can be used to create:
•Studio Lighting from scratch
•Edit/Enhance/Augment existing HDRI environments by loading them into HDR Light Studio
•Create convincing lighting for a back-plate image without an associated HDRI map
Let's go...
In the Materials List, expand 'Environments' tab and enable 'Studio' with the tick box (see Figure 9). The car is now lit with the Studio Environment.
This is the environment we will edit using HDR Light Studio.
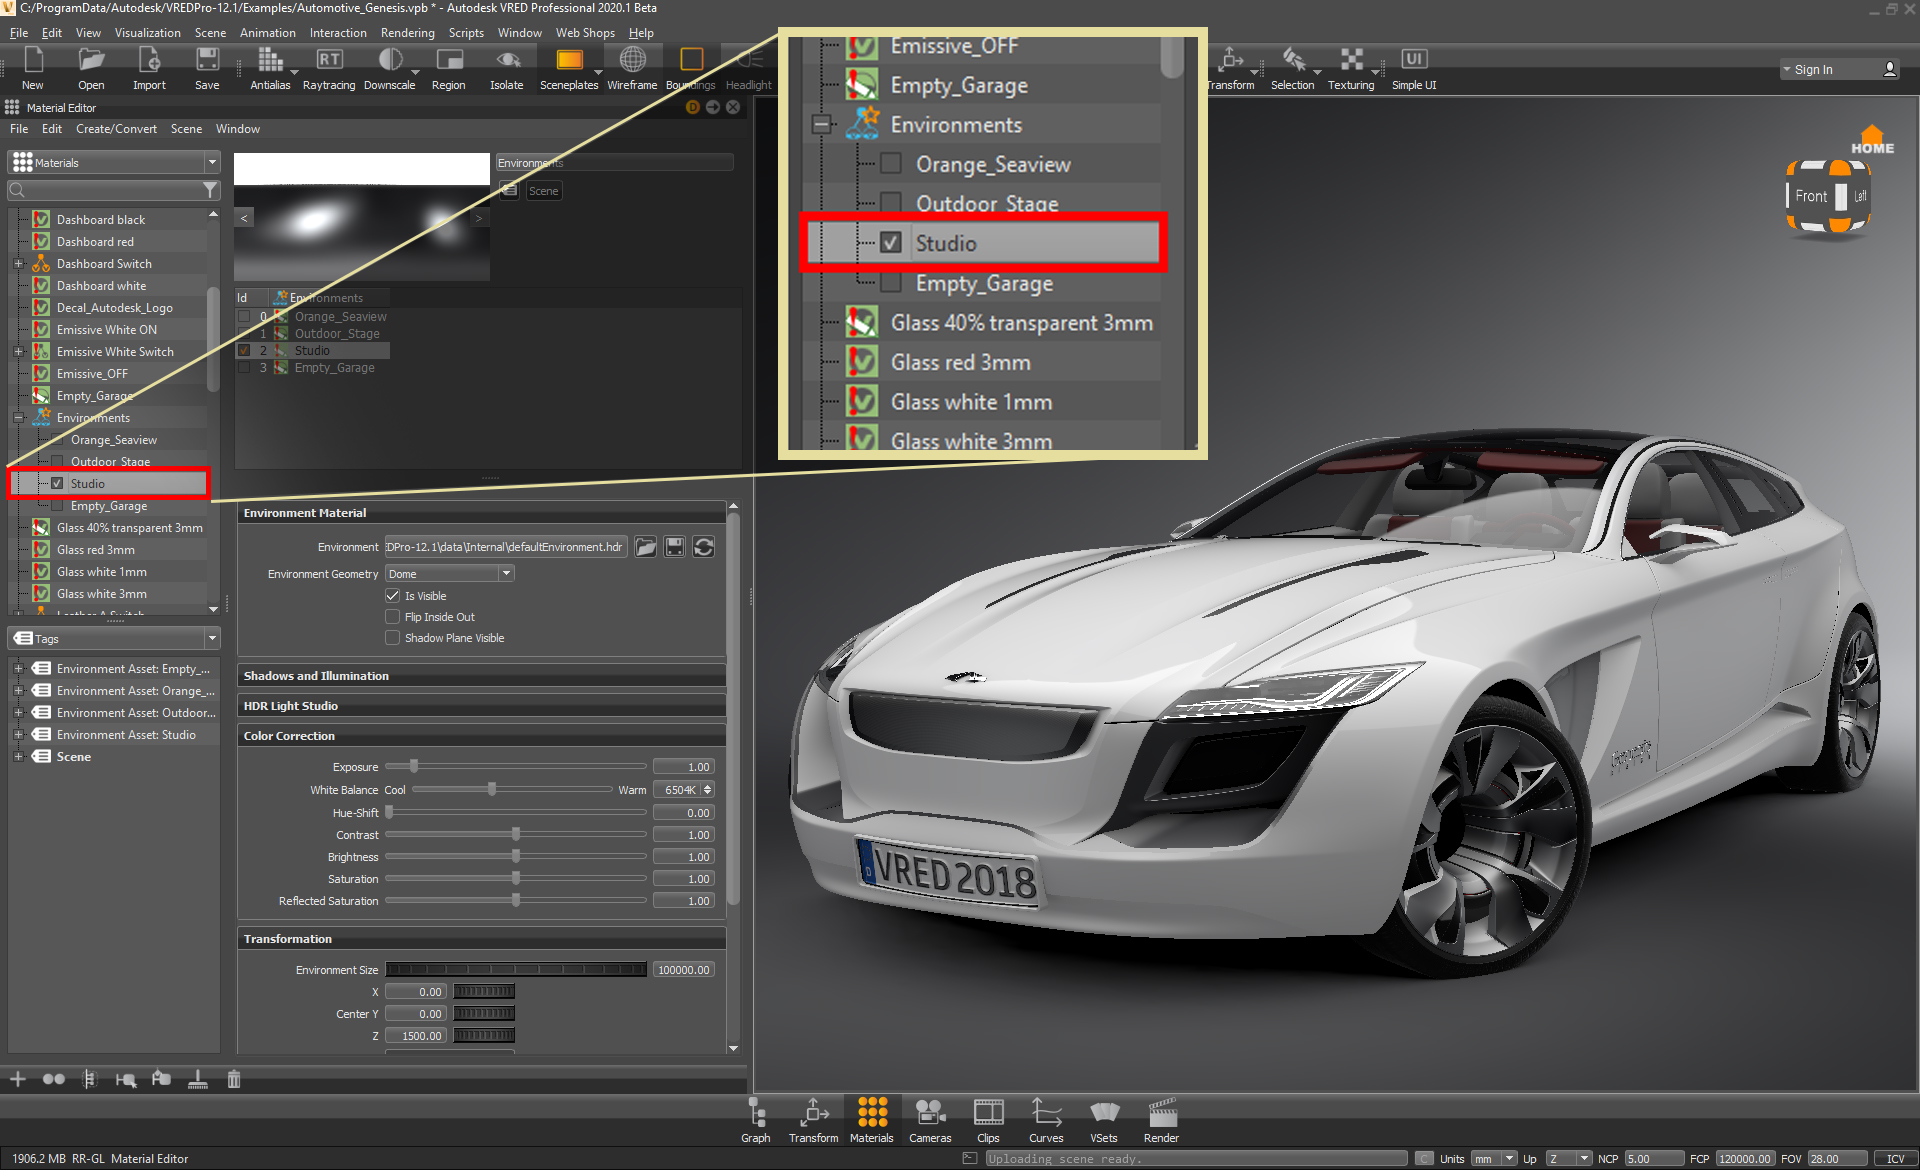
Figure 9: Selecting Studio Environment
STEP 6: In the 'Environment Material' section, change 'Environment Geometry' property to 'Sphere' (see Figure 10a). This allows none distorted placement of lights in all directions around your model.
If you prefer to leave this set to a 'Dome', this is fine, but lights on the floor will be distorted in their shape on the HDRI map.
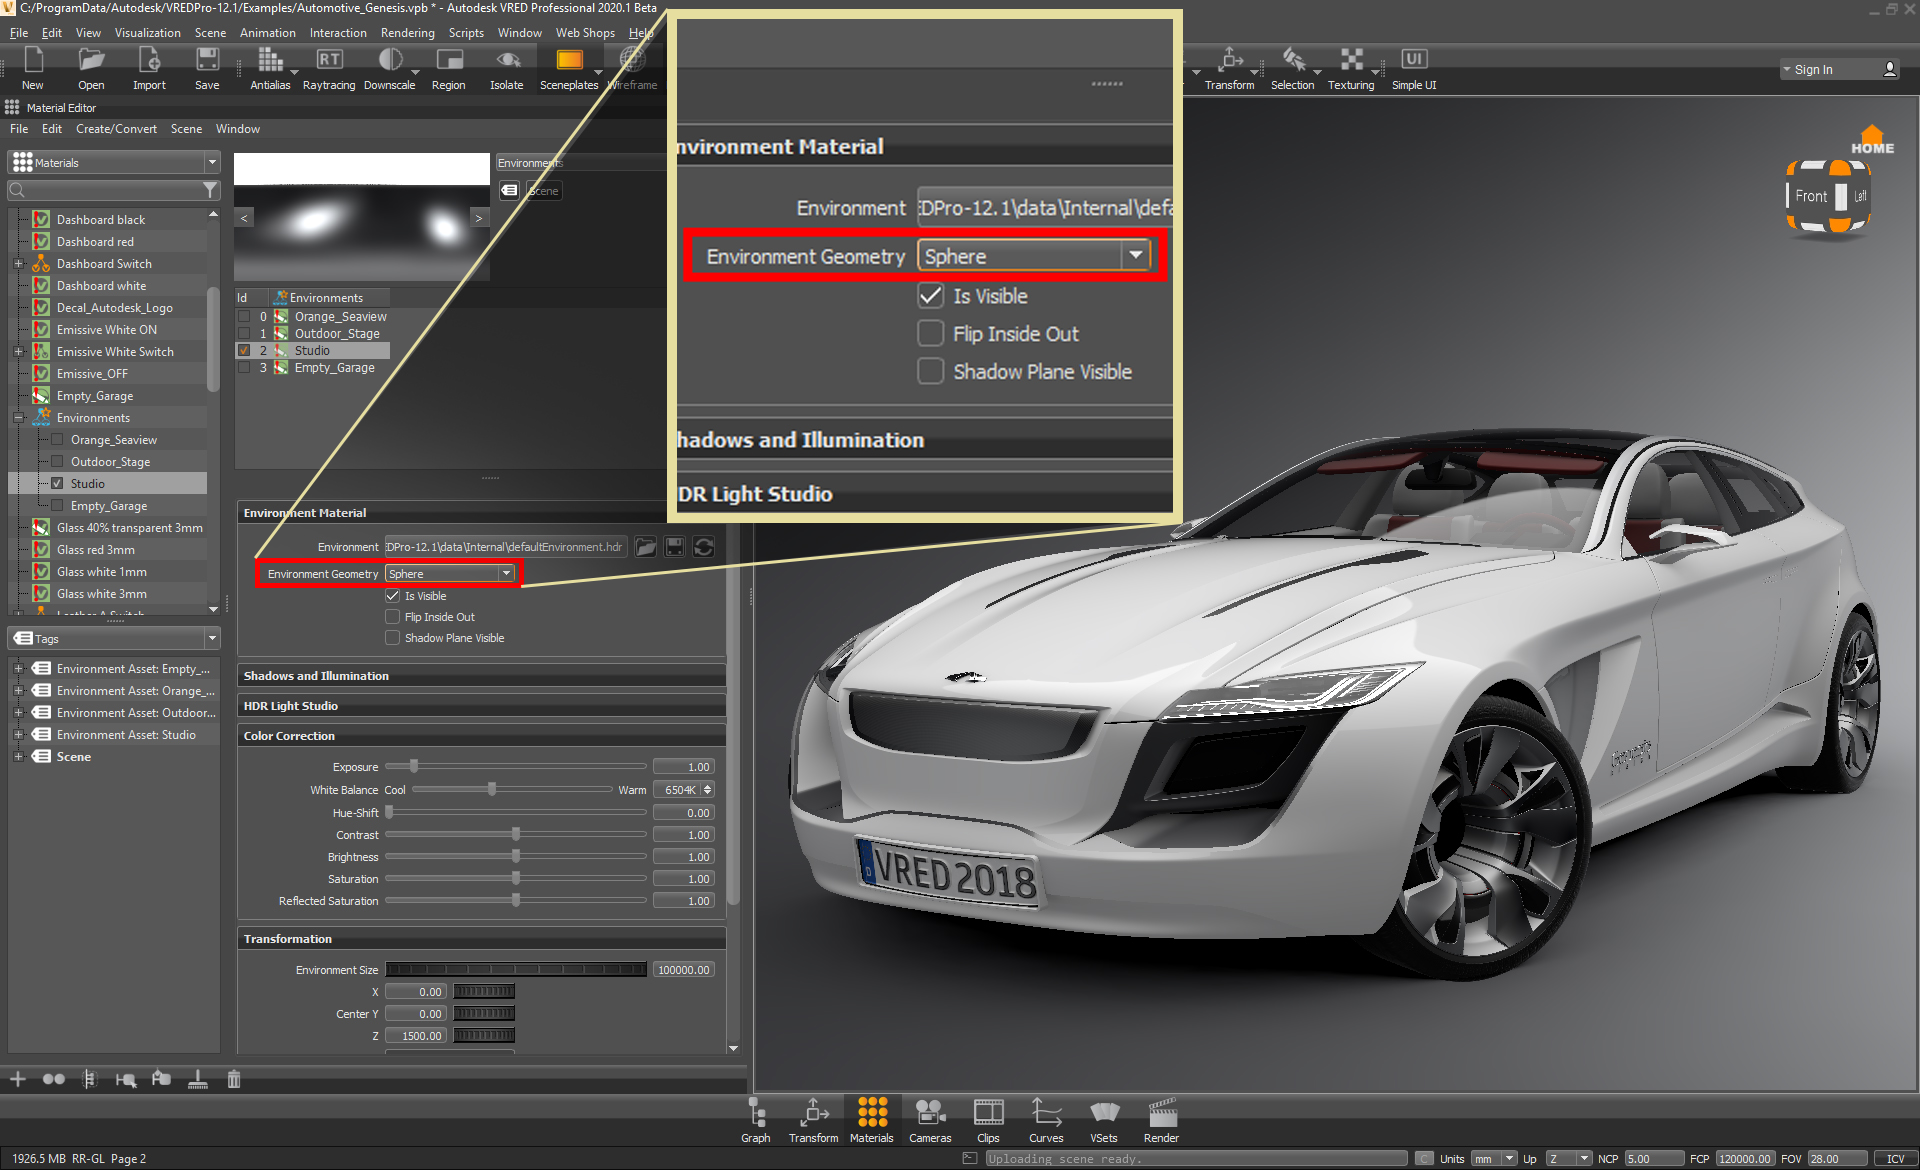
Figure 10a: Setting Environment Geometry to Sphere
Make sure the X,Y,Z Rotations in the Transformation settings for the Environment are all set to 0,0,0. This ensures all lighting is correctly created with HDR Light Studio. (Figure 10b)
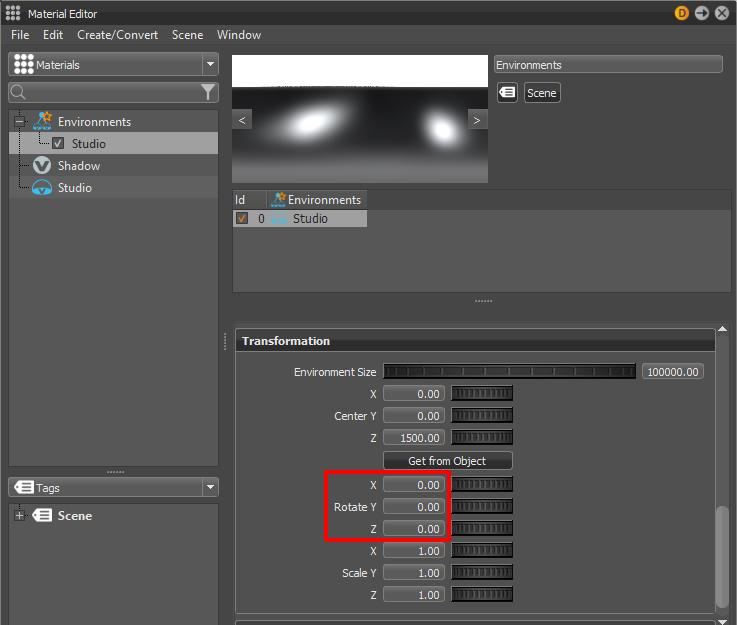
Figure 10b: X,Y,Z Rotations in the Transformation settings for the Environment are all set to 0,0,0
STEP 7: Click on the 'HDR Light Studio' section of the properties to expand it.
Click on ‘Edit & Load Settings’ to start HDR Light Studio connected with VRED (see Figure 11).
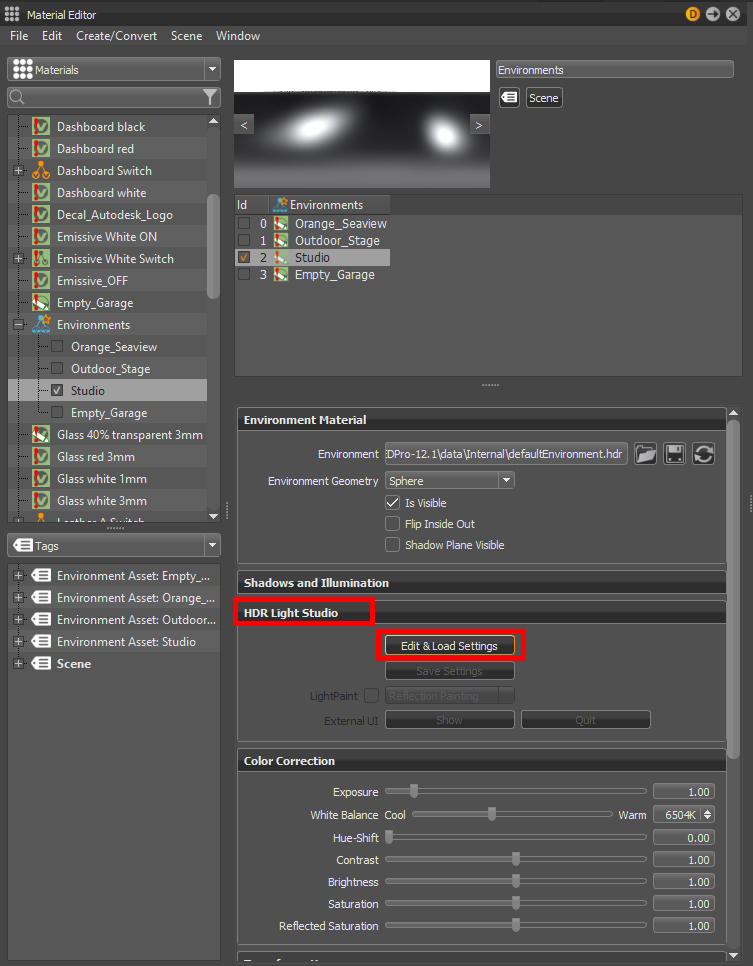
Figure 11: Expanding HDR Light Studio section then starting up HDR
The HDR Light Studio application opens, and is now connected to VRED (see Figure 12).
Please Note: If the HDR Light Studio interface does not look like the layout below, you can reset the interface layout in HDR Light Studio by going to the menu: Window > Layout > Load > Default > VRED
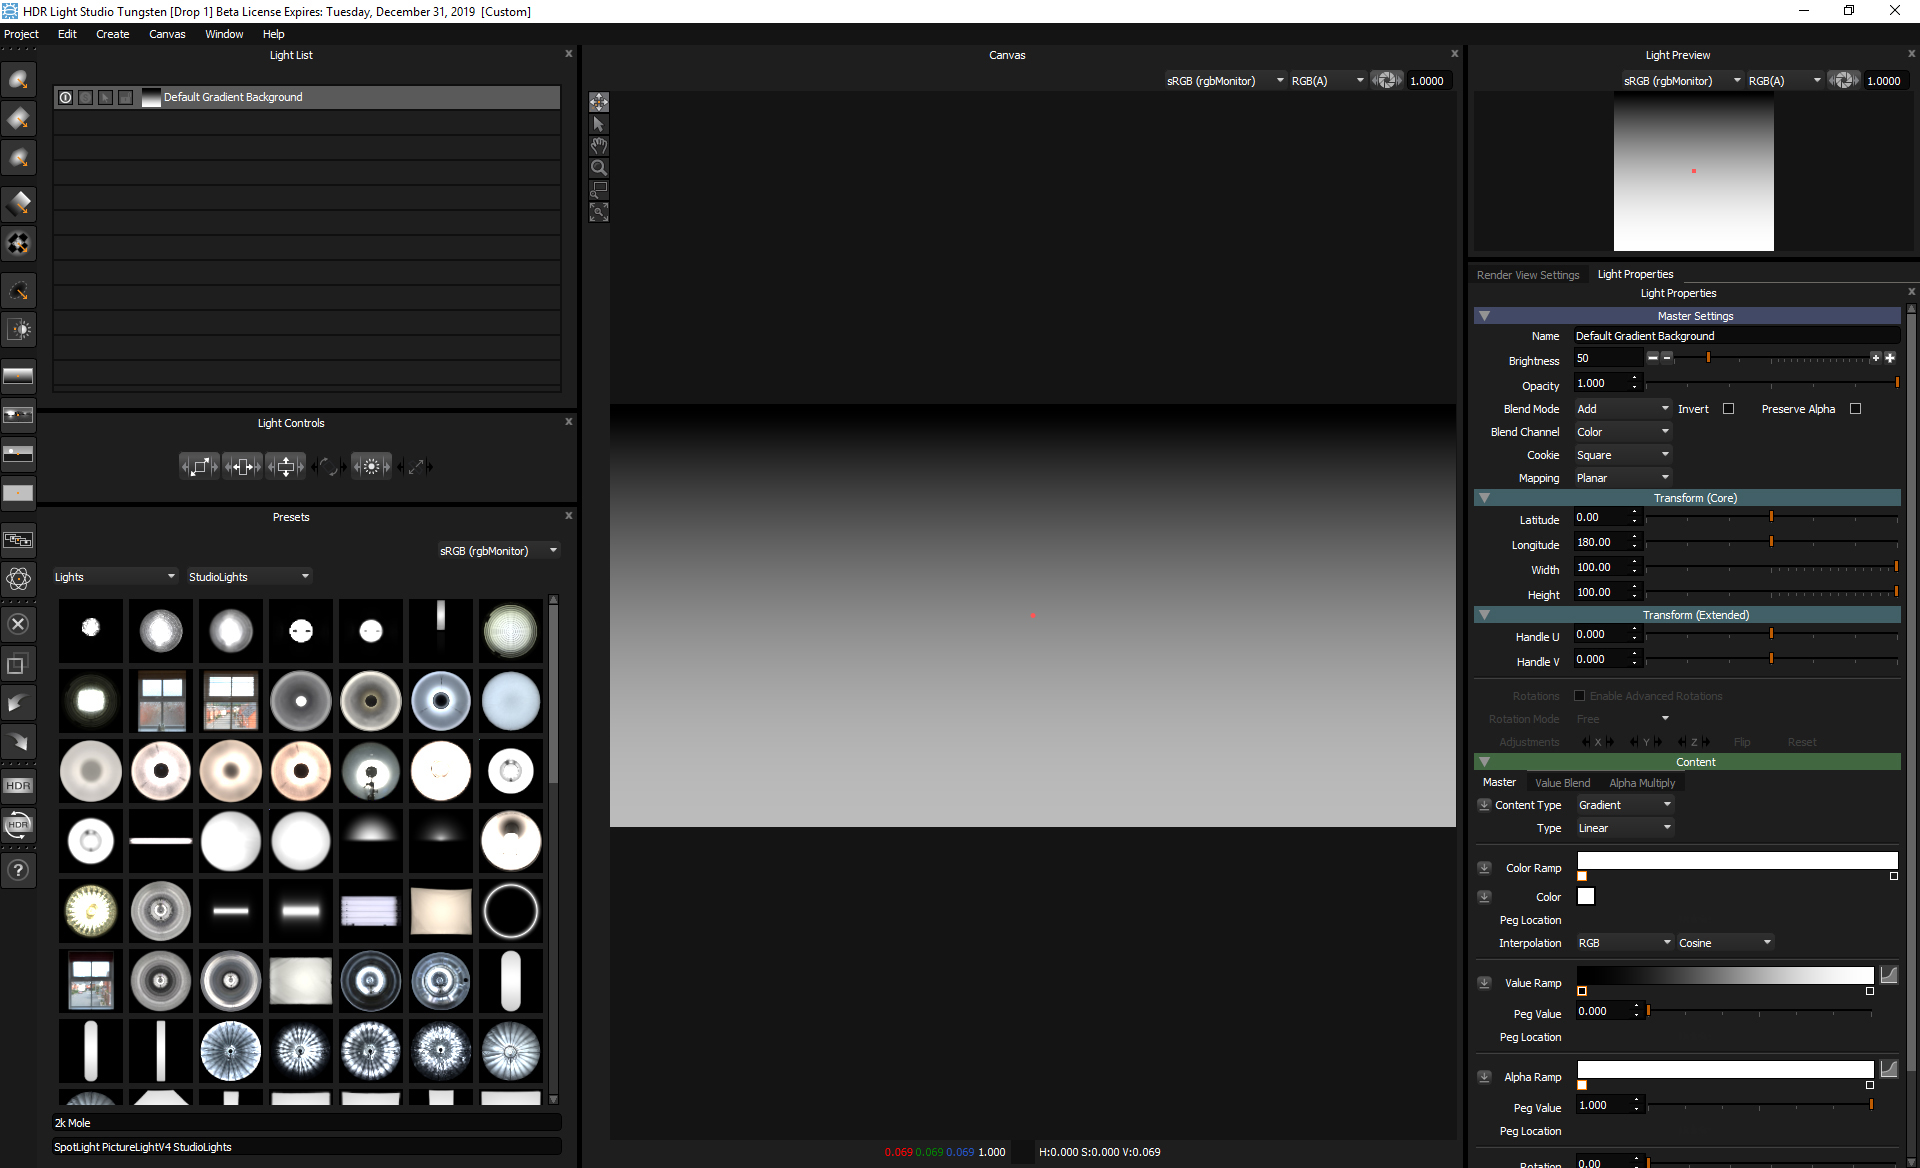
Figure 12: HDR Light Studio on start-up (right)
STEP 8: Place the HDR Light Studio interface onto your second display, if you have one (see Figure 13).
Otherwise you will need to rearrange the HDR Light Studio interface to see both HDR Light Studio and VRED on the same display, which is not ideal and can get crowded.
Notice how the car in VRED is now lit with the default gradient HDRI map coming from HDR Light Studio. The studio environment image in VRED has been replaced with the HDRI output from HDR Light Studio.
The Environment now says: 'HDRLightStudioLive Environment'

Figure 13: VRED (left) running with HDR Light Studio connection (right)
2. Painting Lights onto HDRI Map using LightPaint
STEP 1: In VRED go to the Material Editor, and in the HDR Light Studio section tick the LightPaint tick box to allow you to use LightPaint on the VRED viewport (see Figure 14).
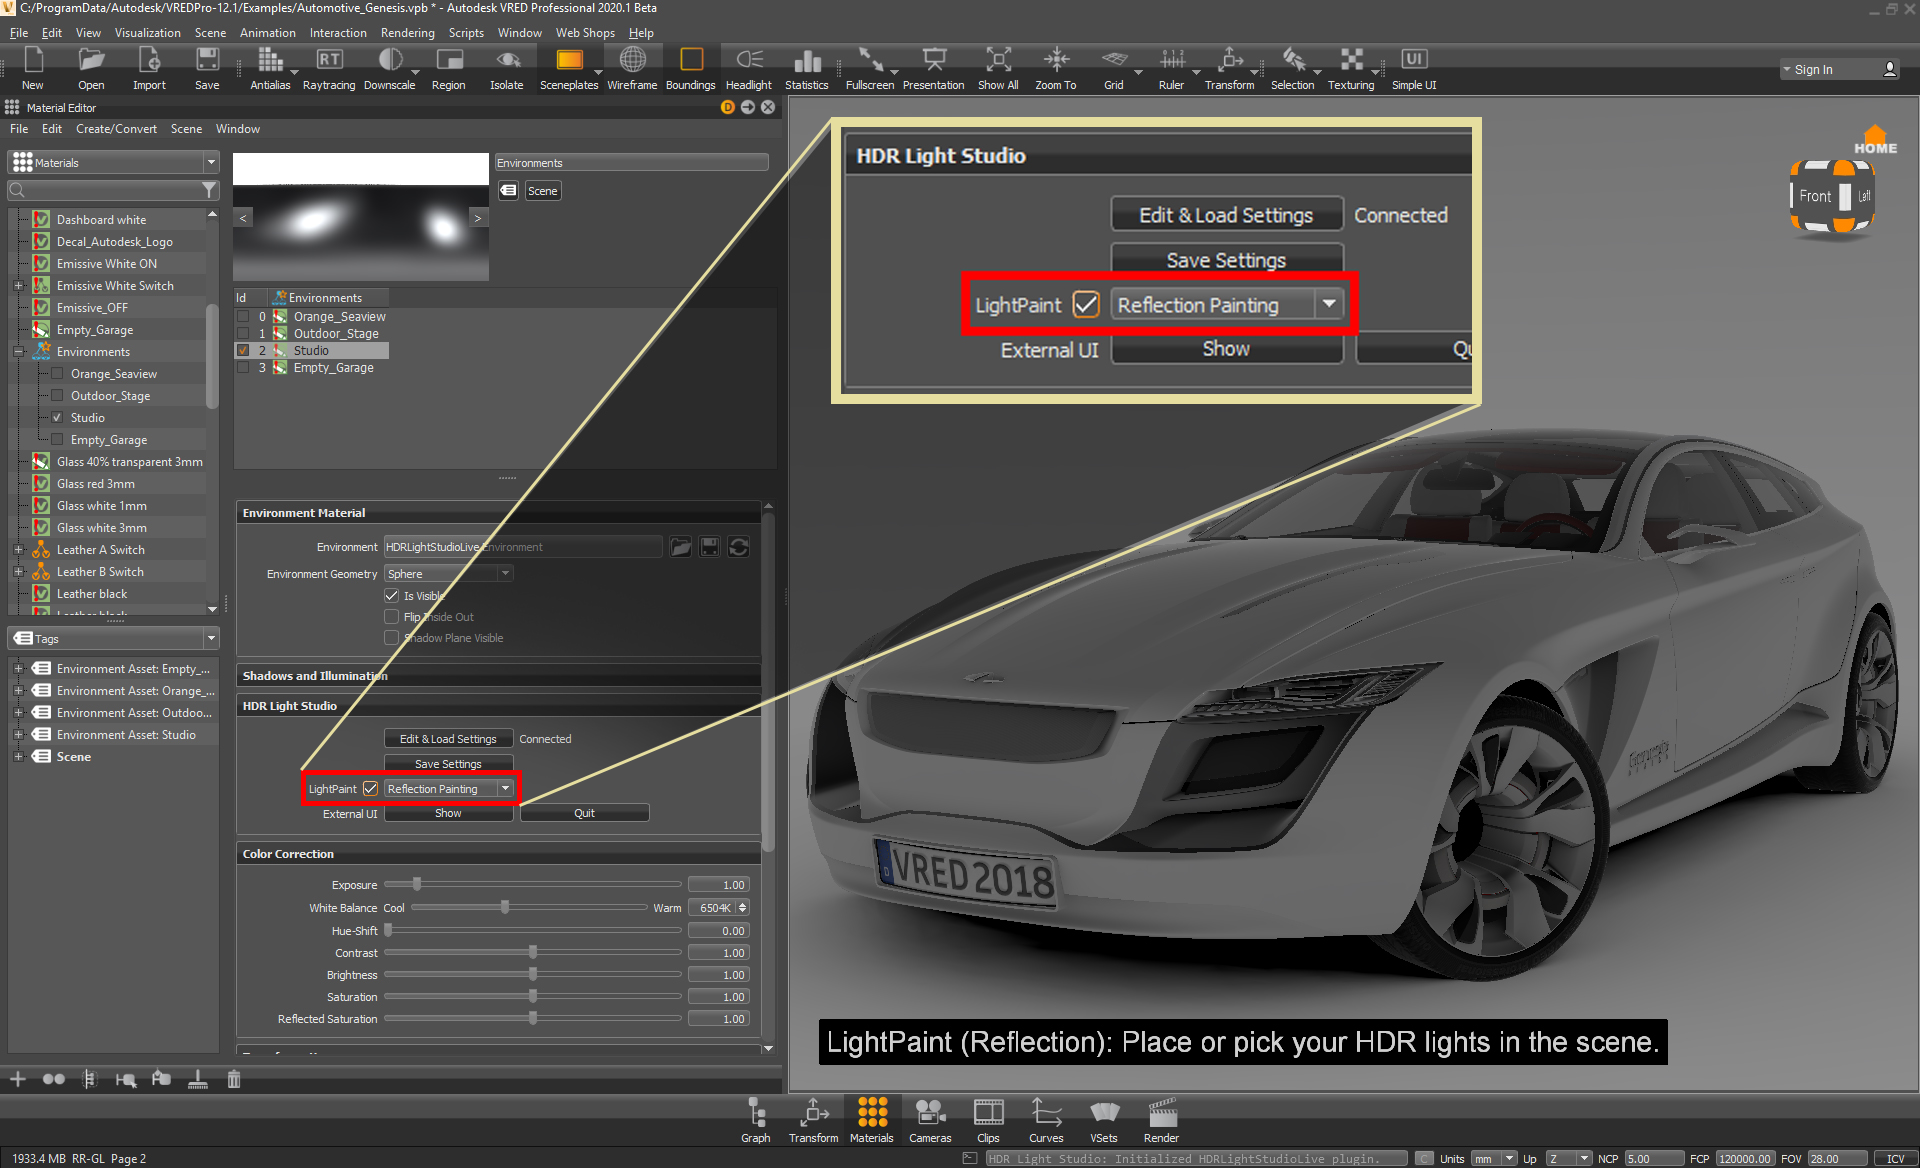
Figure 14: Enabling LightPaint within VRED
STEP 2: In HDR Light Studio add a ‘Rect Light’ from the toolbar on the left. Then inside VRED, while holding the Shift key, left click (Shift-Click) on the car hood/bonnet to position the selected light in HDR Light Studio (see Figure 15).

Figure 15: Painting a rectangular light onto the hood/bonnet of the car.
The selected light will move to a position on the HDRI map that will 'reflect' in the 3D model where clicked.
This is because the LightPaint drop down in VRED is set to 'Reflection Painting'.
STEP 3: In VRED you can click on the ‘Raytracing’ and the ‘Antialias’ icons in the top toolbar to see a more accurate preview of your lighting. But this will provide slower rendering updates and will be less responsive.
Paint more lights until you are happy with the lighting design (see Figure 16).

Figure 16: Raytracing enabled to preview a more accurate lighting design made in HDRI Light Studio
3. Adding Area Lights
New
You can create Area Lights in VRED using: HDR Light Studio Tungsten Drop 1 (and higher) with VRED 2020.1 (and higher).
So far we have been creating a custom HDRI map for the selected VRED environment using HDR Light Studio. When lights are represented on a HDRI map they provide lighting and reflections seen by the entire 3D model with lighting coming from a distance around the entire scene. A light positioned to reflect on the bonnet may also be seen by other areas of the model. Sometimes this is fine, but sometimes you need lights in 3D space that can be positioned closer to your model. Lighting only one area of the model.
Area Lights are light panels in 3D space. A flat rectangular plane emitting light from one side only. Area Lights can be positioned anywhere you want in your scene as a light source. Allowing specific area of your model to get illumination or reflections. The HDR Light Studio connection can create VRED Area Lights and control their size, position and appearance with the mapped HDRI content coming from HDR Light Studio.
STEP 1: In HDR Light Studio create or pick a light of your choice (with 3D mapping, i.e. in the 'Light Properties' panel, 'Mapping' set to '3D') and place it anywhere on the HDR canvas in HDR Light Studio, in this example Umbrella 1 was used (see Figure 17).

Figure 17: Adding a light onto canvas in HDR Light Studio
STEP 2: With the light selected, easily convert the light into an Area Light by ticking the ‘Area Light’ check box in the 'Light Properties' panel (see Figure 18).
Please Note: A light can be returned to the HDRI map and removed as an Area Light in VRED at any time by deactivating the Area Light check box. This change will happen instantly.

Figure 18: Light just before being converted to Area Light
Please Note: If when trying to make an area light in HDR Light Studio you see the error pop up 'VRED does not support area lights' (see Figure 19) and you are using VRED 2020.1 or higher, this indicates the version of HDR Light Studio you are using is lower than Tungsten. Area Light functionality with VRED 2020.1 requires HDR Light Studio 'Tungsten' release or higher.
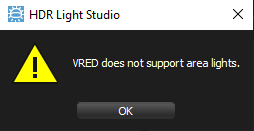
Figure 19: Error message when creating area lights in HDR Light Studio
The light has now been converted into an Area Light in HDR Light Studio and has also been created in VRED. It is likely that the viewport in VRED will not change much because the lights initial size and position will look very similar to when the light was on the HDRI map (see Figure 20).

Figure 20: Light converted into an Area Light
Notice how the name of the light in the Light List in HDR Light Studio now has an area light tag at the end, i.e. [AreaLight], and is color coded yellow.
The promoted area light is now removed from the HDRI map shared with VRED and is created as an Area Light in VRED, with the HDRI content from HDR Light Studio mapped onto its surface.
Please Note: A representation of the area light will still be seen on the Canvas in HDR Light Studio (the canvas provides a lat-long view of both area lights and the HDRI map as viewed from the world origin).
The area lights in VRED will use low res proxy image files containing the light content (HDR RGBA data) that is mapped onto the light surface. These proxy images will be controlled by HDR Light Studio, just like the main HDRI map proxy image is during the lighting process. They will also be replaced when the final rendering of the content is done by HDR Light Studio at the end of the lighting process.
STEP 3: In VRED use Shift-Click to position the selected Area Light using LightPaint (just like positioning lights on the HDRI map before) (see Figure 21).

Figure 21: Positioning area lights using LightPaint in VRED
STEP 4: In HDR Light Studio under Light Properties panel you can use ‘Smart Dolly’ and ‘Dolly Multiplier’ to adjust the distance between the LightPaint position and the Area Light in VRED (see Figure 22).
Smart Dolly will scale the light so it is smaller when closer to the model and larger when it is further away. This means whatever distance away the light maintains the same illumination effect on the model. (If you move a large light close to the model it will get very bright lighting and you would then need to reduce its brightness or scale it to be smaller manually. Using Smart Dolly avoids these issues). Dolly Multiplier simply multiplies with the distance value set by Smart Dolly. This however will not change the size of the light. Dolly Multiplier is ideal as a setting to use to make small adjustments to the distance already set using Smart Dolly, without changing the size of the light. We recommend using Smart Dolly to set the distance to begin with, and make small changes using Dolly Multiplier.

Figure 22: Using Smart Dolly along with Dolly Multiplier to adjust the size and the distance between the light and the car
STEP 5: To achieve your desired effect, you can make further adjustments to the area light in HDR Light Studio. In this example, ‘Cam Visibility’ has been unticked (so the camera does not see the light, but its illumination on the model and reflections can still be seen. Use this setting if the light is visible within the camera shot and you don't want to see it.) and the area light has been rotated using advanced rotations (see Figure 23).
Below is a list of Area Light properties controllable using HDR Light Studio:
•Brightness (Via the brightness of the HDR RGBA content mapped onto the light)
•Size (width and height)
•Location
•Rotation
•Camera Visibility (Toggling visibility of an area light but not its effect on the scene)
•Falloff (Controls the fall off of the Area Light: Quadratic (Realistic in VRED) or Constant (None in VRED))

Figure 23: Turning Cam Visibility off and rotating the area to achieve the desired lighting effect
STEP 6: In VRED go to Scene > Light Editor and then expand the section called ‘Studio Area Lights [HDR Light Studio]’ to see the area lights created by HDR Light Studio (see Figure 24)
Any settings not controllable by HDR Light Studio, can be adjusted in VRED inside the Light Editor.
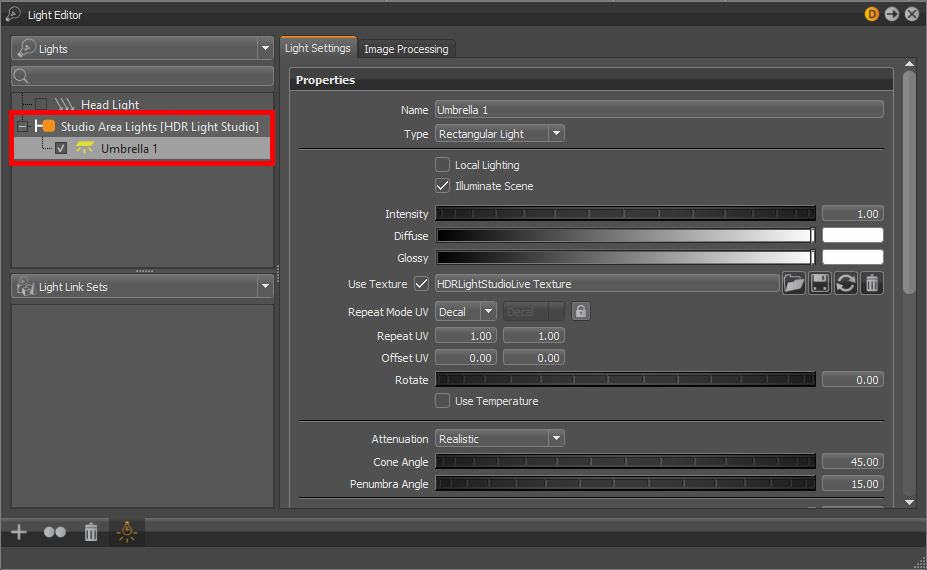
Figure 24: Area lights created by HDR Light Studio being shown in VRED
Please be aware that adjusting settings controllable by HDR Light Studio inside VRED will not update them in HDR Light Studio, these settings are not 'bi-directional'. Next time HDR Light Studio is connected with the VRED scene, settings controlled by HDR Light Studio will be overwritten by HDR Light Studio in the VRED scene.
Please Note: If the 'Type' of the light is changed in VRED from Rectangular Light to another setting, the lights connection with HDR Light Studio is broken.
4. Producing the Final HDR Content
HDR Light Studio will now render higher resolution, high quality sub-sampled HDR images on disk for VRED to use instead of the proxy content used during the lighting design process.
STEP 1: In HDR Light Studio, click on the 'HDR' button on the left toolbar (see Figure 25). This opens the 'Production Render' panel.
Figure 25: Clicking on the 'Render Production HDRI icon' to render the HDRI map file.
STEP 2: The Orientation for the map will be set to 'VRED/VRED' (see Figure 26).
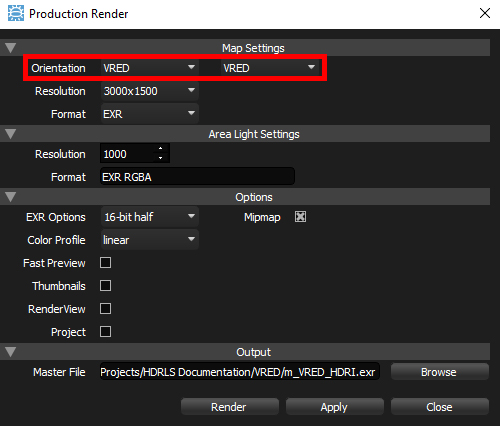
Figure 26: Setting the map orientation to VRED.
STEP 3: Adjust the rest of your settings according to your needs.
Set the Resolutions for the both HDRI map and the Area Lights.
Choose a file name and location for the HDRI content using the 'Browse' button.
Click ‘Render’ and HDR Light Studio will calculate the final content, save it on the disk and update VRED to use that content (see Figure 27).
Please Note: Users can select the Format 'Live' and the rendered images will not be saved to disk, but sent to and stored in the VRED scene itself.
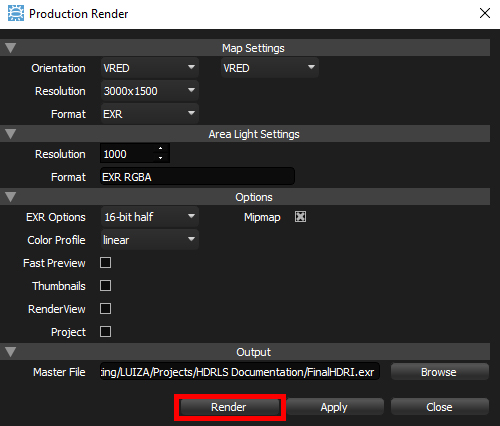
Figure 27: Rendering the final HDRI map file.
VRED will now use the files on disk rather than the temporary low res output (see Figure 28).

Figure 28: Upon saving the HDRI map file VRED updates the environment.
STEP 4: Going back to VRED, in 'Material Editor' and under the 'HDR Light Studio section', click on ‘Save Settings’ to save the HDR Light Studio project against the VRED environment (see Figure 29).
Now when opening this VRED scene in the future and starting HDR Light Studio, the lighting design will be loaded by HDR Light Studio and the lo-res HDR content will be used again, allowing you to edit the lighting design further.
You can now save your VRED scene and use the 'Quit' button in VRED to close HDR Light Studio.

Figure 29: Quitting HDR Light Studio connection
