The Render Settings panel allows you to set a wide range of properties relating to the behavior and appearance of the Render Views.
Use the drop down at the top of the panel to choose which Render View settings you want to adjust.

HDR Light Studio is the native Render View included with HDR Light Studio for fast light positioning and lighting preview.
If you are using HDR Light Studio connected to a supported Host/Renderer, this will also be listed in the drop down, in this example 3DSMax/VRay
Render View Settings for HDR Light Studio's Render View

Scene

3D Scene File
Displays the loaded 3D Scene file path. Use the Browse button to load a new 3D Scene.
Up Direction
Sets whether the scenes Y or Z axis is the "up" axis in the Render View. When the loaded scene file includes an up direction, this setting is set and locked.
However, if you find your model is rotating around the "wrong" axis or your floor shadow is missing, toggle this setting as it is most likely to be the cause.
Scene FPS (Frames Per Second)
When loading an alembic file, the user can choose which frame from the animation to display, via the Frame Number setting in the Render View. Alembic files store time in seconds, not frames, so this setting is provided for the user to tell HDR Light Studio the FPS used in their 3D software. This ensures the frame numbering matches.
Renderer

Max Samples
This is a quality setting for the Render View. Sets the number of rays that are computed to determine the color of a pixel. High values take longer to calculate but give more accurate, less noisy results. To reduce the CPU useage of HDR LIght Studio, you can keep this setting low, so it does not compete for as long a duration when other CPU renderers are also running. This is less of an issue when the other renderer is GPU, because HDR Light Studio's own Render View is CPU only.
Ray Depth
Sets the ray depth for ray traced reflections. A larger ray depth means more object inter-reflections are calculated, this will slow down the render process. The default setting of 2 is suitable for nearly all situations.
Fast Area Lights
Enable this check box, and a single average color/brightness is used for the illumination contribution of the area light. This means a less noisy render result is achieved far faster.
Display

Image Width
The horizontal resolution of the rendered image.
Image Height
The vertical resolution of the rendered image.
Render View
Scale to Fit will scale the fixed resolution image to fit the size of the panel.
Actual Size will display the image unscaled introducing scroll bars as required.
Ident Logo
Turns on and off the display of the HDR Light Studio logo in the corner of the view
Appearance
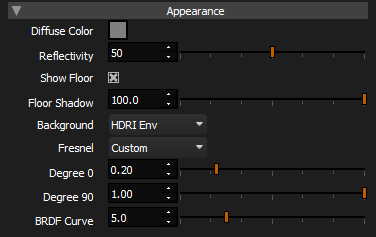
Diffuse Color
Click the swatch to open the color picker to choose a new diffuse color for the shader.
Reflectivity
Controls the reflectivity of the shader used in the Render View. A setting of 0 has no reflection, a setting of 100 is 100% reflective. Please note the reflectivity is also affected by the fresnel setting.
Show Floor
Enables a shadow catcher plane that is automatically calculated to be positioned at a height touching the bottom most point of the loaded model on frame 0. This shadow catcher plane does not catch shadows from area lights, only from the HDRI map.
Please note, Area Lights are not currently visible through this floor.
Floor Shadow
Controls the intensity of the floor shadow, when the Floor Plane is active.
Background
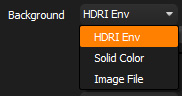
You can choose what appears in the background of the camera view in the Render View.
HDRI Env
This is the default setting and shows the HDRI map lighting the model in the background.
Solid Color
Allows the user to set a color for the background.
Image File
Allows the user to load an image file that is placed in the background with the width fitting into the camera view.
The user needs to also set the Color Profile for the loaded image. In the image below a photograph has been loaded as a background image. But the Color Profile has been left at the default of Linear. Therefore when the image is displayed in the Render View, which has a display LUT of sRGB, the image has in effect had an sRGB profile applied twice.

If we correctly set the Color Profile for the loaded images as sRGB (which most LDR images will be). Then this would have converted the image into linear color space and would have then correctly displayed in the Render View with the sRGB LUT applied. See below.
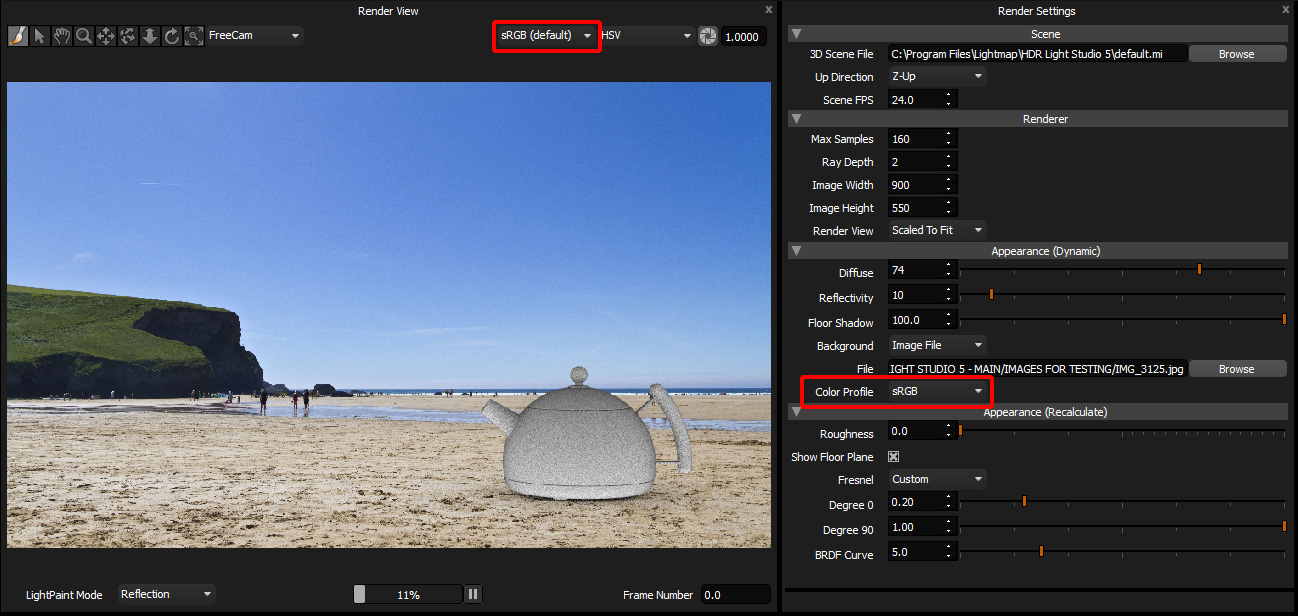
Please note: Whatever zoom level is applied to the camera view, the background image will always fit to the view. Therefore the background does not behave as expected with panning and zooming your shots.
Any changes to the parameters in this section, Appearance (Re-Calc), will cause the gathered samples to be discarded and the rendering will restart.
IOR
Fresnel is set by a single IOR (Index of Refraction) parameter.
Render View Settings for Host/Renderer Render View
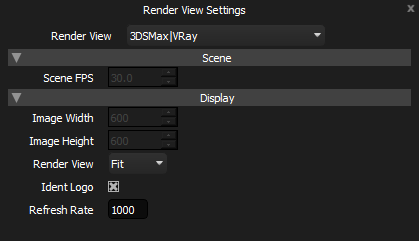
Scene FPS, Image Width, Image Height are read only displayed settings.
Render View
Scale to Fit will scale the fixed resolution image to fit the size of the panel.
Actual Size will display the image unscaled introducing scroll bars as required.
Ident Logo
Turns on and off the display of the Renderer's logo in the corner of the view
Refresh Rate
This setting determines how frequently HDR Light Studio requests a new image from the host/renderer. A setting of 1000 will update the image every second, 500 every half second and so on.
